Showing posts with label 3-D

Saturday Series: Acorny Thank You Card, Berry Basket and Treat

I wanted to share this fun little ensemble with you. I know it's Sunday and I am just getting around to posting this, it has been one of the those weeks when you turn around and say.....Where did the week go? Do you ever have those weeks?  Well here are a couple of great ideas using the Acorny Thank You stamp set. I just LOVE that little set!! The little acorns are just so darn cute! They just make me happy!! So I made a Berry Basket and this card we actually made in my card class this month, and a super fun little treat!!


How fun is that??


Do you just LOVE all the texture here?? Did you notice the paper the leaf is cut out of, it's the new Corrugated Paper (it's on page 148 in the new catalog) Very cool paper!! Also if you were wondering about the Designer Series Paper, it's the Farmer's Market Paper. The polka-dots go so well with the polka-dots on the Acorn. Do you want to know whats great about this? The strips here are small enough that you could get alot of these cards out of one pack of paper.


The inside of the card....makes it fun!
Here is the card recipe:


  • Card base: Soft Suede cut at 4 1/4" x 11"
  • Whisper White (for inside and outside ) 4" x 5 1/4"
  • Leaf cut out of the Corrugated paper with the Leaflet Framelits
  • Farmer's Market Designer Paper: Polka-dot 4" x 1 1/4"; Woodgrain 4" x 1 1/2"
  • Daub the edges of the leaf and the woodgrain paper with Soft Suede ink
  • Layer the Acorn with Cherry Cobbler  2 3/8" Circle Scallop, 2" circle Soft Suede
  • Acorn (card front) top is stamped in Hello Honey, and the base is stamped in Cherry Cobbler
  • Acorn (inside card) top is stamped in Soft Suede and the base is stamped in Hello Honey
  • To get the little bow on top, I simply took the Burlap ribbon and tore the seam off, and then pulled a strand out, tied it in a knot and adhered it with a glue dot
  • The sentiment is stamped in Momento Tuxedo Black


Is that the cutest Berry Basket ever? I found these peanut M & M's at the store and I was doing the happy dance!! They match the colors perfect here!! I put some raffia in the bottom of my basket, and used a small strip of the Farmer's Market Designer Series paper again. The Basket and the strip of polka-dots were cut using the Berry Basket Die!!! Easy-peasy!! I saw a similiar basket on Ronda Wade's blog.


This little treat is too cute!! The center is a Hersey's Kiss, how fun would this be around your Thanksgiving table, or to co-workers, Sunday School class! Cute and Simple


How cute is that from the side?
Directions:

  • cut a strip of cardstock (I used Hello Honey) 4" x 3/4"
  • score at 1, 2 and 3"
  • fold on score lines and use Tombow glue to secure
  • stamp acorn and thankful, use dimensionals to pop and you're done!! (just like the Turkey!!)  ha-ha!!
Have a great day, and I hope you feel inspired!!

Here are supplies I used:



Built for Free Using: My Stampin Blog


post signature
Here we are on our countdown to Sale-A-Bration!! I wanted to show you this quick and easy bag I made using 2 products you can earn for FREE during Sale-A-Bration!  First I used the Best Year Ever Designer Series Paper that you can earn for FREE with a $50 order and the Big Day stamp set that you can also earn for FREE!! What's not to LOVE about that!! These are really cute and versatile items, that you could be used many ways. Today I want to show you this bag (directions at bottom of post) that is real easy!!


Can you believe it?? only 4 days to go till only the biggest sale of the year!! If you need a Sale-A-Bration catalog, email me and I will be happy to send one (www.jangirlholmes@gmail.com)

Here's my bag:


Is that cute or what??


I think a little gift bag like this would make any one's day!! I put a couple pieces of bite size candy in mine. You could also slide in a gift card or just about anything that is a small "thinking of you" kinda gift!


Here's a picture that has a little bit more of a side view. Don't ya just LOVE the new Calypso Coral Trim???


Directions:


1. Pick two pieces of DSP the same pattern, cut 4 1/2" x 6 1/2".
2. Score each one, 1 inch down the two long sides and along 1 of the short sides
3. Fold along the lines and cut along the bottom up to the 1 inch line. Fold in and make tabs.
4. Repeat for both sides
5. On one of the sides, put Adhesive down both side flaps and bottom flap.
6. Nestle both sides together to form your bag.
7. Use the 2 1/2" circle punch and layer Happy Birthday stamped in Coastal Cabana, punched out with the decorative punch. I then layered it with another decorative label punch out of Coastal Cabana.  (I cut it in half to make it layer)
8. I folded a Tea Lace Dollie and secured it with Tombow.
9. Secure top with In-Color Printed clothespins.
10. Decorate with the Calypso Coral Pom Pom Twine and Baker's Twine.


Have a great day! And thank you for stopping by, I will have more fun projects tomorrow as we count down!


I wanted to share these cute little Christmas dog treats. These would be perfect for those little furry friends in your life, stocking stuffers, neighbor gifts. These are quick and easy to make, so you still have time!!


I used the Top Note die as the topper and the Trim the Tree Designer Series Paper.


For the Paw I used the smallest heart for the base of the paw, and the cherries from the Cupcake Punch, trimmed. I applied Crystal Effects to make it shine.


Items Used:
Stamps: Good Greetings (fall hostess)
Paper: Whisper White cardstock, Garden Green cardstock, Sof Suede cardstock, Trim the Tree DSP
Accessories: Cupcake Punch, Heart Framelits, Top Note Die, Cherry Cobbler Ink, Crystal Effects

Have a great day! click here to order and be sure to check out all the clearance!!

Janet Holmes


Tool Tuesday: Crystal Effects


Good Morning Everyone! Today's Tuesday Tool is the Crystal Effects Adhesive. This is a tool I have showcased before on Tool Tuesday, I just wanted to revisit how awesome this tool is! We used it in class the other day (see project below) and I was amzed how many people haven't used it before! Honestly, this is another must have for your papercrafting tool chest. You really only need to buy it once and it will last a long time!! (I have a funny story to share, one of the girls in my club accidently ordered 2 , and she called me and said , "Janet in my lifetime I will only use one, can you use another in your classes?"  We won't mention any names......Barb.... ha-ha!! So my point is this is a great tool, you really will use over and over again, and it will last a LONG time!! So what's so great about Crystal Effects?  With Crystal Effects, you can add a lacquered dimensional look to all of your papercraft projects. It's like magic it turns regular cardstock into a shiny, mirror like finish!!

Features & Benefits
  • Gives a high-gloss finish to any image

  • Creates amazing 3-D effects

  • Applicator tip provides great control

  • Distributed exclusively by Stampin’ Up!

  • Water based for quick and easy cleanup

  • Dries completely within an hour, depending on how thickly it is applied

  • 2 oz.

Quick Trick

Add a drop or two of our Classic Ink refill to the Crystal Effects, and you’ll have a high-gloss colored finish.

Crystal Effects also works great as an adhesive to attach buttons and other heavier embellishments. Add a three-dimensional effect to your projects with Crystal Effects. Simply apply a thick line of Crystal Effects to the outline of your stamped image. After the line has dried, add a thinner coat of Crystal Effects to the inside area of what was outlined.

FYI

Crystal Effects can be used with any stamped image that has been colored with any medium: Watercolor Wonder Crayons, Stampin’ Write Markers, Stampin’ Pastels, Stampin’ Pads.

Do not shake. Shaking Crystal Effects will cause bubbles that will show up in your work. (ask me how I know!! )

Recap after use to prevent the tip from drying and clogging. If you have had yours awhile I will put a toothpick in the top to get it to flow again.

Allow approximately 20-30 min.

For best results, they recommend  using  Crystal Effects within one year of purchase. In my experience it truly lasts a very long time!


Here's the project we used it on, it made the buttons just pop on here!!


Can you see how the buttons just shine??


I thought this turned out cute, like Santa's big 'ole belly!!  :)


                                           How fun it this for a cute stocking stuffer?


So if you are need crystal effects for yourself, or maybe a great stocking stuffer idea, this is a great tool!!


Crystal Effects101055
Price: $6.25

Create a glossy, lacquered look over images, paper, anything. Also works great as an adhesive. 2 oz. bottle; acid free.

Remember TODAY IS THE LAST DAY TO SAVE ON THE EXTRAVAGANZA SALE!!!!  click here to order!!! Savings up to 50% 
off!

TODAY IS also the LAST day to sign up as a demonstrator for $74.25, and get $125 in product!! I know I have mentioned this alot this week, but this is  a GREAT deal if it ever even crossed your mind!!

let me know if you have any questions!! Have a great day!


Janet Holmes 
817-988-2586
jangirlholmes@gmail.com


Tool Tuesday (Gone Wednesday!!) Curvy Keepsake box


I had a little faux pas and meant to post this yesterday! So Tool Tuesday went to wild wednesday... ha-ha!!  I have been having a good time with the Curvy Keepsakes box, so I decided to highlight it in Tool Tuesday. This little tool in the holiday catalog is a keeper! If you don't believe me check Pinterest...these are  HOT!! So I made this little Turkey, he is such a little cutie!!

I wanted to highlight this tool because it is EASY to make and very VERSATILE and in my book that makes a great tool!!


He's pretty cute, right?


I kinda played with the feathers a little, goodness knows...he's got some!! I cut the feathers out of Pumpkin Pie, Crushed Curry, Soft Suede. I put the smaller feathers in the front and the larger feathers in the back, and secured them on 1 1/4" scalloped circle. I put a scalloped circle in the back to, just to give him a finished look.


Now that's some tail feathers....ha-ha!!


Here's a side view. I think this would be so cute as a gift for a neighbor,  teacher, church friend or just sitting around your Thanksgiving table!!


Here's the details:

Feathers: used the feather die and cut 2 small and 2 large feathers out of Soft Suede, Pumpkin Pie, Crushed Curry. I adhered them to a 1 14/" scallop circle and put another scallop circle on the back side.
Eyes:  I used tie Owl Punch for the eye and pupil
Beak:  I used the Triangle Punch and just cut it smaller, and used the small heart punch to make the gobbler
Front Feathers:  I used the 1 1/4" scallop punch and cut it into 2 wedges (one a scallop larger)


Here's a video from Stampin' Up on how to put the Curvy Keepsake together:


Items used:
Stamps:  Good Greetings
Paper: Soft Suede cardstock, Crushed Curry cardstock, Real Red cardstock, Whisper White cardstock, Pumpkin Pie cardstock
Accessories: Curvy Keepsakes Box thinlit, Owl Punch, 1 1/4" scallop circle punch, Owl Punch, Feather thinlits, oval punch


 Click here to see the new weekly specials!!

 Click here to order!!!


Have a super day!!

Janet Holmes


Stampin' Up Something for Baby Gift Bag

in , , , , by jangirlstamps, 5:58 PM
I have been playing with the new Something for Baby stamp set and Framelit, and .I  came up with this super cute gift bag. I wanted to use the new Polka Dot Tag a bag and for some reason to me, baby and polka dots go together.


Is that so sweet? Do you like the little booties hanging on the Baker's Twine? This would also make a cute favor at a baby shower!


Is that cute or what? I used the Retro Fresh Washi Tape to tie in the little booties. I think it turned out real cute!


Items used:
Stamps: Something for Baby, Label Love
Paper: Whisper White
Accessories: Angled Tag Topper Punch, Polka Dot Tag a Bag, Retro Fresh Washi Tape, So Saffron ink, Pistachio Pudding Ink, Calypso Coral Ink, Pistachio Pudding Baker's Twine, 1 1/4" Scallop Punch, 2014-2016 in color Clothespin

Have a great day!

Janet Holmes


I wanted to share these super cute graduation party favors I made for my son's graduation party. I think they are so stinky cute! I basically just wrapped a Mentos candy, I had thought first Rolo's, but with the Texas heat that might be a little messy! :)


I used the Cherry Cobbler Blendabilties on the hat! I did the center with the lightest hue in the Cherry Cobbler then the darker color, using the very darkest for the edge.


I think these will be so cute on the table! Super easy, even better!


The details:

  1. Whisper White 5 1/2" x 3"
  2. Stamp congratulations (from Sassy Salutations) using Staz on ink
  3. put Snail on 5 1/2" side , and roll Mentos candy
  4. use glue dot to hold hat (from Pure Gumption-retired), tie Silver Foil ribbon

Have a great day!

Janet Holmes


Stampin' Up Circle Thinlit Regarding Dahilia

in , , by jangirlstamps, 6:59 AM


So Many Smiles.....

I can hardly get enough of the new Thinlits!! It feels like magic every time I use them!! So here's a happy card using the Thinlit, it makes you look like a rock star!!  (ha-ha!!)


I embossed the front, this is a card we made in class last night! Everyone loved it!!


In the Circle Thinlit, besides the flip part of the Thinlit, there are several other coordinating pieces, like the banner here. LOVE IT!!


Do you love the ribbon on the side?? This card just makes me happy!!


See all the different pieces! Sure makes life easy!!


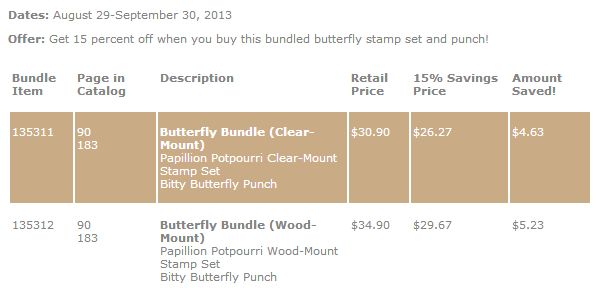
This month the Butterfly Punch and Stamp set are on Special!! This is a great bundle!!


Items used: 
Stamps: Petite Pairs, Regarding Dahlias
Paper: Strawberry Slush Cardstock, Basic Gray Cardstock, Garden Gingham Designer Series Paper
Accessories: Bitty Butterfly Punch, Elegant Butterfly Punch, Strawberry Slush Classic ink, Staz On, 3/8" Strawberry Slush Ribbon.

Have a great day!!

Janet Holmes


Word Play Garden Gloves

in , , by jangirlstamps, 10:44 AM
Imagine Garden Gloves

These are some gloves I bought at Costco and just loved the colors.....so decided to have some fun!  (sometimes you just have to create your own fun!) A little paper, rhinestones and a little imagination...no pun intended! (ha-Ha) and garden gloves redesigned!

 
I think I will give these out to my club members, as last night was our last club class for that group.
 
 
Even though its cold in Texas right now,  I am ready to garden!! I thought this sentiment was perfect for this!!


Have a great day!!
 
Items used:
 
Paper: Lucky Limeade Cardstock,  Tea for Two DSP
Stamps: Word Play, Button Buddies
Misc: Rhinestones, Indigo Island Ruffled Ribbon, Primrose Petals Marker, Indigo Island Marker, Daffodil Delight Marker, Boho Punch, White Tea Lace Dollie,  and some cute gloves from Costco

Stampin' Up Pure Gumption Graduation Treat

in , , by jangirlstamps, 5:12 PM
Graduation Treat Pouch

Here is a treat holder perfect for Graduation Parties!! I used Stampin' Up's medium cello bags and put red M & M's in the bag. I think this would be so cute on a table as a party favor.

 
I just love the Pure Gumption set.


Here's how I made it:

 
                   1. Cut Real Red Cardstock  2 1/2" x 7 3/4"
 
                                               2. Score at 2 3/4", 4", and 6 3/4"
 
                                               3. Cut "2013"  using the Typeset alphabet Bigz
 
                                               4. Using the 1 3/8" Square Punch, cut Basic Black
 
                                               5. Make Tassel using White Bakers Twine
                                         
                                               6. Secure tassel with Glimmer Brad
 
                                               7. Using Medium Cello bags, fill with desired candy
 
                                               8.. Use 2-Way Glue on front flap *** see tip below**
 
 
2-Way glue Tip:
 
Stampin' Up's 2-way glue can be used 2 ways (haa-haa) but really I  think sometimes we forget.
So the first way is permanent: use while the glue is blue. If you want it to be repositional: then apply like normal, let it completely dry then adhere to object and it becomes sticky (but repositional) like a post-it note. Kinda Cool!!  So that's what I did on the flap, applied the 2-way glue, let it dry, then secured, now I can open and close the flap easily.
 
Happy Stamping!!
 
Janet


Quick and Simple Easter Petite Pocket

in , , by jangirlstamps, 2:14 PM
This is a very cute and fast Easter treat. I used the Petite Pocket die and it really went together fast.


I thought this turned out so cute. I used the watercolor pencils and used the blender pen to soften and take away the "pencil" streaks.  By the way...had to test out the candy, and it was yummy! :)


Items used:
Cardstock: Indigo Island, Pool Party Designer Series Paper, Daffodil Delight, Whisper White
Misc: Petite Pocket Die, Daffodil Delight Seam Binding Ribbon, Scallop Square Punch, Square punch


© Jan Girl · THEME BY WATDESIGNEXPRESS