Showing posts with label 3-D projects
Here's a fun Christmas treat that's quick and simple and CRAZY CUTE!! I am taking this little snowman to work to give out as fun treats!! I think everyone will love them!! See what you think?


  Are these precious??? These are perfect quick and simple treats when you need a lot!! I hope not only do they give my co-workers a sugar rush, but a  big smile!!


Here's a closer look at him....is he cute!!

All you need is 3 powdered donuts, snack bags, a black and orange sharpie, ribbon and some hungry friends!!!!  :))



I made this little sign with the Snow Friends stamp set and matching framelit!!  I think it turned out sooo cute!!

This would make a great gift for co-workers, teachers, neighbors, classmates...  Have fun, hope you feel inspired!!


Have a great day!!


post signature

I know it has been so long since I have shared on my blog!! Life is good, it just sometimes gets busy, right!!  Today, I wanted to share this super cute wine topper that I made.  I  started with the Santa's Sleigh thinlits and  just kept playing and adding, and well I just LOVE the way this turned out!! Check it out and see what you think...


How fun is that??  Don't ya just love the sparkly paper in the background??  It is actually little flecks of gold foil, perfect for this project. It's from Pop of Pink Designer Series paper, it  just added the right amount of fun here.


I thought this turned out great!! This makes a fun way to give wine, any type of alcohol or sparkling cider!!


Here are the directions:


  1. Garden Green 3 1/2 x 8 1/2", scored at 2 3/4"
  2. Pop of Pink Designer Series paper 3" x 5 1/4"
  3. Sleigh:  bottom part-Gold Foil,  the upper part Real Red
  4. Garden Green for the tree
  5. 'Merry'  was cut out of the Christmas Greetings thinlits using Real Red
  6. I used the Real Red Marker on 'Christmas' from the Candy Cane Christmas set, banner the edges.

I hope you like it!! Thanks for stopping by!! BE SURE to check out this INCREDIBLE SALE at Stampin' Up!! 


Stampin' Up! Year-End Closeout, Shop with Dawn O, #dostamping


December 1 - Jan. 3:
Shop:   to shop the retiring and discounted products! 
Retiring and Closeout Stamp Sets (over 70!)
Retiring and Closeout Bundles (over 30!)
Retiring and Closeout Paper (over 25 selections) 
Retiring and Closeout Accessories (over 100  selections!!)


Click here to order!!!


post signature


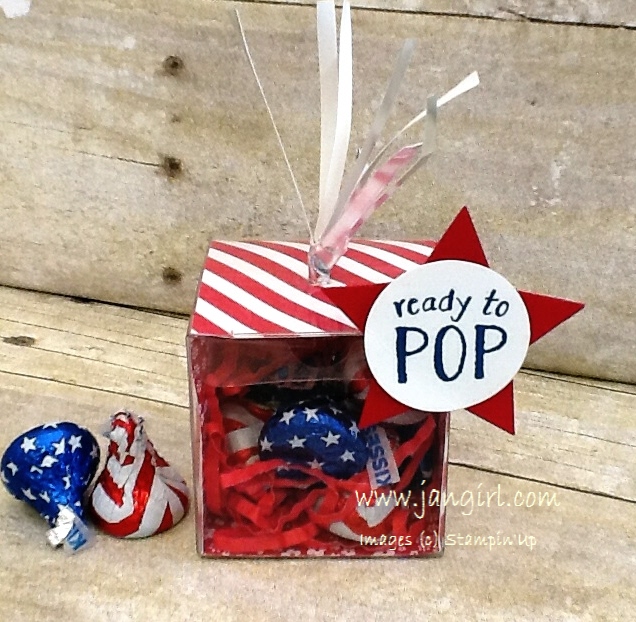
Here's a quick and easy treat I made for the 4th of July. The new Clear Tiny Boxes make this treat a 'snap'   ha-ha!!!  The Ready to Pop stamp set is just perfect for this treat!! I found myself laughing to myself as this came together!! See what you think.....


Is that the cutest thing ever??? I love the Patriotic Hershey's Kisses!!


I used the Brights Designer Series Paper 2" x 6" scored at 2", 4", 6".  I used the Fringe Scissors on the Silver Foil paper to make the top of the firecracker! I then used a 1/8" hole punch on the top of the box, this allowed me to poke the Silver Foil paper in. I stamped the sentiment in Daper Denim. 

This was a fast and crazy cute 4th of July treat!!

Have a great 4th and be safe!!

post signature
Saturday Series: Another GREAT way to use the Balloon Celebration stamp set!!

I am so excited to share this ultra cool idea with you!! Just about the time you think, what else can I do with that Balloon Punch? Well get that Easter Basket ready....how about some eggs!! Look at these great ideas ( I meant to post this yesterday...my Saturday got away from me, does that ever happen to you?)

Here are my treats using the Balloon punch gone Easter egg.


Are those adorable?? I LOVE it when I can make more out of a stamp or product than originally thought!! That makes it valuable!! Here's how to make to make these "Easter Eggs"using the Gorgeous Grunge stamp set,the Balloon Celebration stamp set, and Balloon Punch. In no time you got yourself a cute Easter Egg!!


First stamp the Balloon from Balloon Celebration (I stamped with Bermuda Bay on Pool Party cardstock). The Balloon Bouquet Punch and the Balloon Celebration come in a bundle, that saves 15%. 


Then add Gorgeous Grunge stamp set ( I used Soft Suede) near the bottom of the egg, like speckles.


Then use the Balloon Punch and simply snip off the end of the Balloon and you got yourself an Easter Egg!!  :))


For my first treat, well..... I had to make one for only the best dog ever!! :)))  Here's what I came up with:


I kinda cracked myself up, when I realized if I combined the No Bones about It, and the Greatest Greetings stamp set, I could create this sweet lil treat!! Here is another dog treat I made at Christmas using this same idea. I guess you could say we LOVE our little girl!


For this treat, I turned to the Fry Box. I used the Hardwood stamp to create a background, I stamped it after  I cut the Fry Box out. I added grass on the bottom using the Fringe Scissors. The strip I used for the grass was 1 1/2" x 4", and it fit perfect. I used the Circle of Spring stamp set to make the tag. Pretty cute, right??


Here's an Easter card I made using the Easter Eggs.  I used the Suite Sayings stamp set. What a fun card!! I thought adding the partial doilie on the side was a nice touch.


Here are the items I used:


Have great day!! Happy Easter to you and your family!!! (and your four-legged family members!!)  :)

post signature

I wanted to share this quick and simple Easter treat bag. What makes this such a fast little treat, is that it uses folded bags. You could use this to hold a treat or a gift card.  Because these treats come together pretty quickly, so you still have time to make a couple of these for Easter.


Is that cute??


In my little treat bag,  I put a card in it and Easter M & M candy. This was an idea I got from Patty Bennett, I first made these at Christmas time. So you could make these and put a candy in the back pocket, or a gift card. This is a great little gift, that just says "thinking of you" that you can tuck in an Easter basket, or leave on a desk for co-worker, or mailman, or just about anyone would love this!!


To make this I took the Kraft bag, and folded it, not in half exactly but just enough that I would have 2 pockets. Once it's folded the 2 pockets are created from the folded area and then the bag opening.  I then wrapped a 1 1/2" inch x 11, piece of It's My Party Designer Series Paper. One tip here is I lined up my seam in the back, so all seams are together. I think I learned  to line up seams from my mom, when she was teaching me to sew as a kid. :))


I then stamped my little chick in Archival Basic Gray ink. Then I  took my Daffodil Delight stamp pad and squished it (above), I like to call this CPR (that's the nurse in me!!  Hee-hee!) and that gets just a little ink on the upper lid.


I then used my Blender Pen, to apply ink to the sides of the edge of the chick first, then blend my color over the rest of the chick.


Here's what all my goodies look like.I stamped my sentiment from Suite sayings in Calypso Coral, on a 4" x 3 1/2" piece of Whisper White cardstock. Do you love the corners?? I used the Curvy Corner Trio Punch on the edges, I think this really made it so sweet!! I also used a Stampin' Write Calypso Coral marker on the chick's feet and beak. I used a Tea Lace Doilie to finish it off.

Here are the items I used:


Have a great day!! This Honeycomb Happiness is one of the FREE stamps you can get during Sale-a-bration!! It has been a popular one!! Sale-a-bration only lasts till MARCH 31st, so don't miss out on this precious stamp. Click here to order!!


post signature


I have to share this fun little treat with you. I just makes me laugh when I look at these cute little treat bags. I used the Party Pants stamp set, and the Washi Label punch, and then  just started to crack up. You have to check these out......


Are those too fun or what???

Here's a closer look


I used the Washi label punch to make the pants, to me the In-Color designer Series paper was a perfect choice. They kinda look like hippie pants...hee-hee!!  I saw a card made with pants on a clothesline on Frenchie Stamps blog, and my mind went spinning!! This cute little stamp is from the new Sale-A-Bration stamp sets that were recently released, and you can get it FREE right now until the end of March.

Here is what the rest of this stamp set look like.

Party Pants Clear-Mount Stamp Set

item # 141327.

This stamp set could be used for baby cards, graduation, birthdays, very versatile stamp set. What's not to love?? a super cute stamp set that is FREE with a $50 order!!!

Pretty cute, right!! I will be sharing many more ideas using this stamp set. I made a bunch of these for my class this week, and I am sure to get many laughs!


Here are the items I used to make this treat:


Have a great night and be sure to click here to place your order.

post signature


Saturday Series: Paper Pumpkin Cute Conversations

I have to show you what ideas I came up with for this month's 
Paper Pumpkin Cute Conversations. I got mine in the mail yesterday, and honestly I tore that box open and said "WOW" and my mind began to spin thinking of all kinds of ideas!!  I knew right away this kit would be perfect for this Saturday's Series.I so LOVE this kit!!!
Take a look at what I came up with:


This kit was loaded with all kinds of good stuff. It came with 30 heart cut outs, twine, clothespins, sequins and stamp set. I have a video from Stampin' Up at the bottom of this post. I made the Banner and the pouches according to directions that came with the Paper Pumpkin, but was able to do so much more! I was able to get my banner (used 5 of the hearts) and made 3 pouches, a scrapbook page, and 17 goodie bags for my class next week!! WOW! All I added was a little more paper for the scrapbook page, and 17 of the Sketched Dots Tag a Bags.


Here's another look, I took off my scrapbook page, and just put on the pouches! Is that too sweet??


Here are my pouches, I used 2 hearts to make each pouch. Very fun and cute!! I stamped the little banners with the "to and from"...then I began to get all giddy!! :))


Here are my goodies bags I made for my class this week. Crazy cute right??  (if you are seeing this and going to class on Tuesday, please act suprised!! )  :)  I stamped each heart and used the banners, added bows to my clothespins, and added sequins.  Inside I put some yummy chocolate!!


Do you see the small hearts on the bags, I utilized every inch on the paper and used my Sweetheart Punch to punch out hearts.


Now there is NO waste there!! ha-ha!!

I then used one of these pieces of "left over" paper and made a  frame for my scrapbook page! This is our sweet dog Myah, who we love so very much!!


I used the stamp to make the  bottom border sweet, and XOXO. If you knew are dog, you would know she's a sweetheart!!


Here's a video on the Paper Pumpkin, what a great kit!!


When I thought about how much I got out of this kit, this little math equation kinda summed it up.


ONE PAPER PUMPKIN=1 SCRAPBOOK PAGE, 3 POUCHES, BANNER, 17 TREAT BAGS!!    wowza!!

Right now during Sale-A-Bration, you can order 3 months of Paper Pumpkin and earn a FREE Sale-A-Bration item. Perfect Timing!!


Item # 137859

Have a great day!!

post signature
Saturday Series: Bloomin' Heart die and Love                                    Blooms cards and treat box

For my Saturday Series (posted on Sunday.... I spent yesterday doing chores!) :)) I wanted to share these pretty cards and treat box I made using the Bloomin' Hearts die. I just think that the new heart die is so stunning and intricate, it makes you look like a rock star!! I made a Valentines card and treat box, but this heart is not just for Valentine's day, it can have many uses!! Here are my Bloomin' Heart creations, see what you think?? I entered the Anniversary card in the Global Design Team Challenge.


Isn't that just gorgeous!! They all look so cute together!!  Each one of them uses the Bloomin' Heart Die a little different, to create completely different looks!


I hope this picture captures how pretty this card is. When I showed it to my husband, he said WOW, that is really pretty!! We made this in class and everyone loved it. What is great about this stamp set is that you can use words like friend, be mine...not just for couples!!

Here are the details:

  • Card base: Blushing Bride 5 1/2" x 8 1/2" folded in half
  • Layers: Rose Red: 4" x 5 1/4"
                 Whisper White: 3 3/4" x 5"
  • Strips: 1/4" x 3 3/4" of Blushing Bride Glimmer Paper  (so pretty in real life!!) and Love Blooms Designer Series Paper
  • Bloomin' Heart: cut out in Blushing Bride, daubed on edges and here and there with Rose Red I cut the flowers (that come in the Bloomin' Heart Die) with the Blushing Bride Glimmer   paper, and added a glue dot and adhered them behind the flower...I thought this made the flower 'pop', they sort of peek through. I stamped the Bloomin' Love flowers onto thier coordinating flower. ( I love how it all coordinates!!)

    (tip: the flowers in the Bloomin' Love have a 'pointer' on top so you can easily line up..love that!!)


  • Sentiment: I stamped the outline in Rose Red and fussy cut around it, and the 'Be Mine' was stamped in Blushing Bride


How fun is this?? I used the Gift Bag Punch Board to make this. I just made mine shorter, so it really made a box! I used the Medium guides on the Gift box punch board. On this one, I just cut the heart out of Rose Red and just layered it. Did you notice the flower embellishment?? It's on page 27 of the new Occasions catalog! It added a little extra sparkle here!!


Is this sooo pretty? I made this card for my Brother's anniversary. Their wedding colors were pink and black, 27 years ago!! (he married my friend and college roommate, how lucky did I get??) I used a couple new products on this card, can you guess how many? (answer at the bottom of this post). I really liked this card so I entered it in the Global Design Team Challenge this week which is Love this week.

GDP019


Here's a closer view.

Here are the details:


  • Card Base: Basic Black 4 1/4" x 11" folded in half
  • Layers: Blushing Bride 4" x 5 1/4", Whisper White 3 3/4" x 5" (I tore the bottom to add interest, plus I adhered it crooked!! ) I am telling all my secrets!!  ha-ha!!
  • I cut the Bloomin' Heart out and then just placed in back in place, like a puzzle with all the intricate pieces showing through!! This turned out very elegant!
  • I used the Timeless Love stamp for the sentiment, I stamped that on the Perfectly Artistic Designer Series paper (a Sale-a-bration paper that is FREE right now, until Feb 15th)
  • I added a piece of the White Organza ribbon and a flower jewel (Botanical Garden Jewel)
  • To add a little bit more jazz..I used the Wink of Stella around the egde of the Heart, this really creates a subtle but striking shimmer!! WOWZA!!
I hope you have enjoyed today's cards and treat box. Please be sure to check back on Saturday's, I like to take one product and show it in a couple different ways!!

Here are the products I used:


Built for Free Using: My Stampin Blog


Click here to order. Remember if you place a $50 order, you will receive a Sale-a-Bration item free!! I will also send you the cards for FREE that we made in our card class this month!!! You don't have to email me, I will get your address off your order!! Thank you for stopping by today!

Now if you guessed 4 on the the question above your were right! I used the Bloomin' Heart die, the Wink of Stella, the Perfectly Artistic Designer Series Paper, and the Botanical Garden Jewels!

Have a great day!!!

post signature
© Jan Girl · THEME BY WATDESIGNEXPRESS