Showing posts with label quick and simple
Here's a fun Christmas treat that's quick and simple and CRAZY CUTE!! I am taking this little snowman to work to give out as fun treats!! I think everyone will love them!! See what you think?


  Are these precious??? These are perfect quick and simple treats when you need a lot!! I hope not only do they give my co-workers a sugar rush, but a  big smile!!


Here's a closer look at him....is he cute!!

All you need is 3 powdered donuts, snack bags, a black and orange sharpie, ribbon and some hungry friends!!!!  :))



I made this little sign with the Snow Friends stamp set and matching framelit!!  I think it turned out sooo cute!!

This would make a great gift for co-workers, teachers, neighbors, classmates...  Have fun, hope you feel inspired!!


Have a great day!!


post signature

Here's the cutest card made using the Birthday Bouquet Designer Series paper. This is a card we are doing this month in my Sweet and Simple class. To me this card is a "wow" card that was pretty simple to make. I often wonder when I make a card like this, why can't they all be this easy and awesome!


I just think this card turned out so sweet, it just makes me smile.


I used the Triple Banner Punch that I talked about in Tool Tuesday this week. I used the 2 1/2" circle punch for the flower designer paper, it really is a fast, awesome card!!

Thank you for stopping by, here are the items I used to make this card:


post signature
Here's a quick and simple Valentine's card that is so very sweet!! I just love this card!!I used the Hello stamp from Sale-A-Bration that is FREE with a $50 order, and combined it with the Bloomin' Love stamp set.


Is that so cute?? I love how sweet and elegant this card turned out.


I just love the touch of the pearls, and the wispy lace, it just creates a gorgeous card!!! I can't wait to send this card out!!


I stamped the inside of the card to complete the card. I got the idea for this card from my friend and Upline Christi Beck.  The Hello stamp is a LIMITED Sale-A-Bration item that is only available till February 15th.

Here are the items I used:

Built for Free Using: My Stampin Blog


Have a great night!!


post signature
I wanted to share this card we made in class this month. I used the new Rose Wonder Die to make this beautiful card that is has two completely different looks. This is a simple card that packs alot of WOW! That's my kinda card!!


To make the first card, I simply used the Rose from the Wonder Rose thinlit, and used it as a mask. So I held the rose cut out in place and started with the leaves, daubed the leaves in Old Olive using a sponge. I then sponged the outside of the rose using Rose Red. To make the center 'pop' I daubed the rose center with Real Red. I then took off the rose cut out and a stencil like effect was created. To make the card, with a more of a 3D effect, I simply adhered the rose cut out on the daubed rose. I added Old Olive Gorgeous Grunge to the sides. What do you think??


Which one is your favorite?


One great idea, is don't apply the Rose die and you can make this stencil type of card over and over again. I used the Whisper White Thick cardstock to cut it out, to make it more durable.

Here are the items I used:


Built for Free Using: My Stampin Blog


Here are the specials for the week:


Built for Free Using: My Stampin Blog


Have a great day!!!

post signature
Saturday Series: Cherry on Top and Tin of Cards

Every Saturday on my blog I like to highlight a particular stamp set or theme...just to add some fun to the week. Well my Saturday got away from me, if you have college students returning to college, I know you can relate! Or getting the kiddo's ready! Well if you are someone who is busy this time of year, you will LOVE these cards! They are quick and simple and you can use for just about anyone on your list. All you need is a few tools and just a little bit of time!!  Yippee!!


Aren't those cute?? With a few strips of paper you can create 3 different looks with the Cherry on Top paper. I wanted to show that's it's not just for birthday cards!


Here's a cute anytime card, that comes together quickly. I layered a Bermuda Bay and Watermelon Wonder card stock and a little strip from Cherry on Top. Very cute!! If you have a friend you wanna send a little card that would cheer up their day, try this one!!


This is a fun card that again, just uses a couple strips of Cherry on Top Designer Series Paper!! This is a happy card! I added a rhinestone to add a little sparkle!!


This Birthday card could be used for a man or a woman. I don't know about you, but somehow birthdays sneak up on me...I know they only come around once a year and I know they are coming...but somehow poof they are here!! Ahh!! This card will help me out!!

I hope you have enjoyed these cards!! The Cherry on Top paper is a happy paper that can be used for many different types of cards, not just birthdays! I sometimes have to remind myself that everything we make doesn't have to be complicated, there is alot to say about simple!! I once heard this quote "if we can complicate it, we will". So I hope you feel inspired to use one stamp set a few circles and a couple strips of paper and you will be set!!

Have a great night!

Here are the items I used:


Built for Free Using: My Stampin Blog


Click here to order!! Thanks for stopping by today!

post signature
I am so excited to share this Work of Art card with you. I hope you have enjoyed this week sharing many different ideas using the Work of Art stamp set. This card is a great Masculine card, perfect for a birthday or Father's day card.


What do you think?? Fun isn't it??


I started with Marina Mist, and stamped down the card without re-inking. The next color I used was Soft Sky and stamped down the card again, the last color used was So Saffron.. This mixture of colors created this greenish, blue, fun water color.


I really love the colors. I hope you feel inspired to get out your Work of Art stamp set, if you haven't played with it lately. Or if you need to add to your collection, this is a GREAT stamp set!! Click here to order yours today!!


Here are the items I used:


Built for Free Using: My Stampin Blog


Make sure to get your favorites from the retired list here before they are gone!! Have a great night!

post signature


Saturday Series: Lovely Amazing You and For Peeps Sake Easter Treats

I wanted to share these cute Quick and Easy Easter treats I made using 2 stamps that go so cute together!The Lovely Amazing You is an adorable photo polymer that was released last month...it is crazy cute!!! So for these treats I combined it with the For Peeps Sake stamp and they just turned out so cute! These would be great for Easter baskets, neighbors, co-workers, friends and family!!
Any bunny should LOVE these!!!!


Are those cute or what??  I showed these to my hubby and he said " I love you more than chocolate!!" right answer!!


For this little treat I used the Scallop Tag Topper and added the egg banner. Super fun!! I just may need a visit from the Easter Bunny myself!!


I tied the bow and added the Calypso Coral Pompom Trim  to add some flair!!!


Here's a candy bar that just made me giggle when I made it. 


I started out with a piece of  Crisp Cantaloupe Designer Series Paper 5 1/2 x 5 1/2. The Whisper White is 4 1/2 x 1 3/4.  The Old Olive is cut using the Fringe Scissors one direction, then I angled the scissors and cut back over the grass to give it a more rugged look. For the flower, the stem is made using the  leaf on Bird punch, I just trimmed a couple of leaves off. The flower is cut from the Itty Bitty Accents Punch.


For this little treat I used the Top Note die. I just think this turned out super cute!! The little grass on the bottom just adds to it.


I used the  ribbon from the Best Year Ever accessory pack (FREE from Sale-A-Bration!!) to finish it off!!

I hope you guys liked these and feel inspired to making some fun things for Easter!!
Built for Free Using: My Stampin Blog


Have a great day!!  Click here to check out the Sale-A-Bration items!! Only here for a couple more weeks!!


Janet Holmes


I wanted to share these quick and easy thank you cards that I made. I think that recieving a thank you card tucked in your order is sort of like cracker-jacks...it's the little suprise that puts a smile on your face!! I also  really like the Petal Potpouri stamp set, the variety of flower styles and the matching punch makes it an awesome set!!

Here's my card:


It's clean and simple. One of my favorites in the new catalog is the Painted Blooms Designer Series paper, it just looks good with everything!! I honestly have yet to see something made with it that I don't like.


For the center I used the Itty Bitty Accents punch to make the center pop!! Do you recognize the sentiment?? It's from the Lotus Blossom Sale-A-Bration stamp, that you can get for FREE from now till the end of March. Be sure not to miss out!!

Click here to check out all the Sale-A-Bration items!!


Have a great day!!

Janet Holmes


Tool Tuesday: Crystal Effects


Good Morning Everyone! Today's Tuesday Tool is the Crystal Effects Adhesive. This is a tool I have showcased before on Tool Tuesday, I just wanted to revisit how awesome this tool is! We used it in class the other day (see project below) and I was amzed how many people haven't used it before! Honestly, this is another must have for your papercrafting tool chest. You really only need to buy it once and it will last a long time!! (I have a funny story to share, one of the girls in my club accidently ordered 2 , and she called me and said , "Janet in my lifetime I will only use one, can you use another in your classes?"  We won't mention any names......Barb.... ha-ha!! So my point is this is a great tool, you really will use over and over again, and it will last a LONG time!! So what's so great about Crystal Effects?  With Crystal Effects, you can add a lacquered dimensional look to all of your papercraft projects. It's like magic it turns regular cardstock into a shiny, mirror like finish!!

Features & Benefits
  • Gives a high-gloss finish to any image

  • Creates amazing 3-D effects

  • Applicator tip provides great control

  • Distributed exclusively by Stampin’ Up!

  • Water based for quick and easy cleanup

  • Dries completely within an hour, depending on how thickly it is applied

  • 2 oz.

Quick Trick

Add a drop or two of our Classic Ink refill to the Crystal Effects, and you’ll have a high-gloss colored finish.

Crystal Effects also works great as an adhesive to attach buttons and other heavier embellishments. Add a three-dimensional effect to your projects with Crystal Effects. Simply apply a thick line of Crystal Effects to the outline of your stamped image. After the line has dried, add a thinner coat of Crystal Effects to the inside area of what was outlined.

FYI

Crystal Effects can be used with any stamped image that has been colored with any medium: Watercolor Wonder Crayons, Stampin’ Write Markers, Stampin’ Pastels, Stampin’ Pads.

Do not shake. Shaking Crystal Effects will cause bubbles that will show up in your work. (ask me how I know!! )

Recap after use to prevent the tip from drying and clogging. If you have had yours awhile I will put a toothpick in the top to get it to flow again.

Allow approximately 20-30 min.

For best results, they recommend  using  Crystal Effects within one year of purchase. In my experience it truly lasts a very long time!


Here's the project we used it on, it made the buttons just pop on here!!


Can you see how the buttons just shine??


I thought this turned out cute, like Santa's big 'ole belly!!  :)


                                           How fun it this for a cute stocking stuffer?


So if you are need crystal effects for yourself, or maybe a great stocking stuffer idea, this is a great tool!!


Crystal Effects101055
Price$6.25

Create a glossy, lacquered look over images, paper, anything. Also works great as an adhesive. 2 oz. bottle; acid free.

Remember TODAY IS THE LAST DAY TO SAVE ON THE EXTRAVAGANZA SALE!!!!  click here to order!!! Savings up to 50% 
off!

TODAY IS also the LAST day to sign up as a demonstrator for $74.25, and get $125 in product!! I know I have mentioned this alot this week, but this is  a GREAT deal if it ever even crossed your mind!!

let me know if you have any questions!! Have a great day!


Janet Holmes 
817-988-2586
jangirlholmes@gmail.com


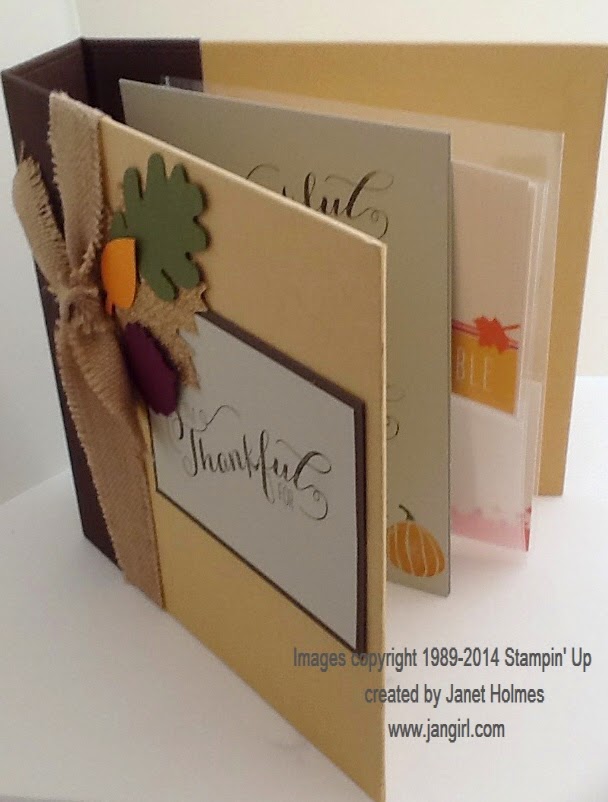
I wanted to share this adorable scrapbook I made for Thanksgiving. I used the 'I'm Thankful for...' stamp set to make the cover for the Project Life album, and for the pages inside. For the Project Life pockets I used the Seasonal Snapshot card collection. This turned out so cute and for me we had family in from out of state, and some family friends for the holidays, so I wanted it to be special.


So here's the front of my album:


For these first pages, I stamped the 'I'm Thankful for' to use for journaling. I stamped enough for each family member, and friend to write a message. We made this in our Scrapbook Saturday class last month, I am anxious to hear how each person used theirs. What an incredible way to capture some memories!!


We passed this around, before we ate as everyone was chit-chatting and catching up. I think this album got all of us to think about what we are truly thankful for! What a wonderful way to start out our Thanksgiving. I got the original idea for this album from Ronda Wade.


On some of the pages, I stamped pumpkins from Fall Fest.


This area is the 6 x 8 pocket pages, that I will fill with pictures.


Here is a closer look at the front cover.


Items used:
Stamps: I'm Thankful for
Paper: Misty Meadow cardstock, Tangelo Twist cardstock, Blackberry Bliss cardstock, Champagne Glimmer paper, Sahara Sand cardstock, Early Espresso cardstock
Accessories: 6 x 8 Espresso Project Life album, 6 x 8 Project life pocket pages, Seasonal Snapshot project life card collection, Burlap Ribbon


I hope you had a wonderful time with your family over Thanksgiving!!
Thanks for stopping by!


Click here to order! Tomorrow is the LAST day to take advantage of all the great savings on the EXTRAVAGANZA!!

Janet Holmes


Stampin' Up Chalk Talk Monochromatic

in , by jangirlstamps, 8:36 AM
Happy Thank you Card

This little card is so sweet to me. I just really like it! This is my first card to use the Chalk Talk stamp set, really like it. It is one of the bundle sets that Stampin' up is offering! Love that!

 
I layered the Pansy punch and the Blossum punch. Did you notice the Washi Tape on the sentiment. It is really easy to use and pretty forgiving ! :) Tommorrow in Tool Tuesday, I will highlight Washi Tape, its pretty fun and super easy to use.


This is actually a quick and easy card, because it's all done with punches and framelits and a premade dollie. So this is a keeper type of card to me. I don't know about you, but sometimes my life gets ahead of me. A simple but cute card like this is a design to keep.


Enjoy!
 
Janet Holmes

Items used:
 
Paper: Strawberry Slush, Whisper White
Punches: Pansy Punch, Blossum Punch
Stamps: Chalk Talk
Accessories: Tea Lace Paper Dollie, Gingham Garden Washi Tape, Strawberry Slush Ink, Vintage Faceted Designer Button, White Baker's Twine, Glue Dot
© Jan Girl · THEME BY WATDESIGNEXPRESS