Showing posts with label christmas
I wanted to share this really pretty and elegant Christmas card I made for an upcoming swap. I know it's July, and if your weather is like Texas, then maybe this is the card that you need to get your mind off this hot weather!! :)  July oddly enough is a time many people start thinking of Christmas. This month at our demonstrator meeting we are swapping Christmas in July cards. For my card I combined the New Merry Mistletoe stamp set along with one of my favorites, the Star of Light stamp. I hope you like it!!!


I honestly LOVE how this turned out. I used the sketch  #294 from Freshly Made Sketches.


I love the Falling Softly embossing folder!  It just adds the right amount of detail.


Did you notice the faceted gem in the center? I also added a little bit of Silver thread behind the star. I continued the star theme with the new Be Merry Designer Series Paper.  In this card I basically used a silver and star theme, what could be better for Christmas.  If you're like me, Christmas gets here before I know it, so this year I am gonna get a head start!

Thanks for stopping by today! Here are the products I used, they are all available in the New Catalog in case you want to get started too!! If you need a new catalog email me at jangirlholmes@gmail.com.

Have a great day!!


post signature
Here's a fun Christmas treat that's quick and simple and CRAZY CUTE!! I am taking this little snowman to work to give out as fun treats!! I think everyone will love them!! See what you think?


  Are these precious??? These are perfect quick and simple treats when you need a lot!! I hope not only do they give my co-workers a sugar rush, but a  big smile!!


Here's a closer look at him....is he cute!!

All you need is 3 powdered donuts, snack bags, a black and orange sharpie, ribbon and some hungry friends!!!!  :))


I made this little sign with the Snow Friends stamp set and matching framelit!!  I think it turned out sooo cute!!

This would make a great gift for co-workers, teachers, neighbors, classmates...  Have fun, hope you feel inspired!!


Have a great day!!


post signature

I know it has been so long since I have shared on my blog!! Life is good, it just sometimes gets busy, right!!  Today, I wanted to share this super cute wine topper that I made.  I  started with the Santa's Sleigh thinlits and  just kept playing and adding, and well I just LOVE the way this turned out!! Check it out and see what you think...


How fun is that??  Don't ya just love the sparkly paper in the background??  It is actually little flecks of gold foil, perfect for this project. It's from Pop of Pink Designer Series paper, it  just added the right amount of fun here.


I thought this turned out great!! This makes a fun way to give wine, any type of alcohol or sparkling cider!!


Here are the directions:


  1. Garden Green 3 1/2 x 8 1/2", scored at 2 3/4"
  2. Pop of Pink Designer Series paper 3" x 5 1/4"
  3. Sleigh:  bottom part-Gold Foil,  the upper part Real Red
  4. Garden Green for the tree
  5. 'Merry'  was cut out of the Christmas Greetings thinlits using Real Red
  6. I used the Real Red Marker on 'Christmas' from the Candy Cane Christmas set, banner the edges.

I hope you like it!! Thanks for stopping by!! BE SURE to check out this INCREDIBLE SALE at Stampin' Up!! 


Stampin' Up! Year-End Closeout, Shop with Dawn O, #dostamping

December 1 - Jan. 3:
Shop:   to shop the retiring and discounted products! 
Retiring and Closeout Stamp Sets (over 70!)
Retiring and Closeout Bundles (over 30!)
Retiring and Closeout Paper (over 25 selections) 
Retiring and Closeout Accessories (over 100  selections!!)


Click here to order!!!


post signature


Saturday Series: Cookie Cutter Christmas Reindeer card, treat and tag

I am so excited to share these cute Christmas ideas. I haven't posted on my blog in a while-life has been busy!! But I am back!! The holiday catalog went live on the 1st and it is spectacular!!! On Saturday's I like to showcase a particular item (stamp, paper, or accessory) and use it several different ways. 

Here is my 1st Christmas share from the holiday catalog:


How cute is that??  I used the reindeer cookie cutter for all these, there is actually a gingerbread man, eskimo, bear, and santa on that set as well.


How sweet is that tag?? I love the Red Glimmer paper for the nose!!! I used the owl punch for the nose, too fun!! The "to and from" are also from the Cookie Cutter stamp set.  Did you notice the printed paper at the bottom....oh my...one of my favorites!! It's the Candy Lane Designer Series Paper.


For this cute lil' reindeer treat, I used the new Cheerful Tag Framelits...and let me just say... I'm in LOVE!! Very easy to use and wow it does all the work for you.  It is actually meant to make tags, but I opened it up and made a tag topper!! This framelit cuts, scores-and you are done!!! I used the bow part on the Cookie Cutter builder punch, and also used the owl punch for the nose!! I used my computer to generate the wording! I used chocolate covred nuts for the brown noses, the red one is a jelly bean.  :)  I googled it and their is actually 9 reindeer, including Rudolph!!!


I just love how this card turned out.  The designer paper I used here is from the Annual Catalog, called The Christmas Specialty paper. I thought the sentiment went great here, kinda fun like the card.  It's from Stitched with Cheer.  I had some fun building the santa hat here, using the new Jolly Hat Builder!! I tell ya what, Stampin' Up hit it out of the park with the new catalog!!! I had to use the new jingle bell too!!

I wanted to share a trick with you on how to save paper. Did you notice the hat and the striped paper are the same?? Well I cut the hat out of the paper and then used it behind, this saves paper and know one will ever know....just you me and the elf!!! Hee-hee


I hope you enjoyed this fun set!!! Have a great night, be sure to click here to order.

If you would like to check out the new catalog, click on the catalog on the right side of this post.


post signature

Christmas party and Christmas class cards

in , by jangirlstamps, 7:26 AM
I am late on posting this, but it was too fun not to share. For my card class this month we had a Christmas Party and card class! Boy did we have fun! We had a hot cocoa bar, even though winter hasn't come to Texas, we had some yummy hot cocoa!! We made cards and gift cards, everyone had a treat under the Christmas tree from 'santa' and more laughs that Ol' Saint Nick himself! :) Between taking pictures using  silly Christmas photo props and listening to Christmas music, and having yummy snacks it was a FUN night!!

Here's the cards we made, we made 2 of each.


The Santa Suit card was the easiest:


Here are the details:

  • Real Red card base: 8 1/2" x 5 1/2"
  • Whisper White center: 1 1/4" x 5 1/2"
  • Basic Black belt: 1 x 4 1/4" embossed with Boho Chic embossing folder
  • Center buckle: Basic Black and Silver Glimmer (on Weekly Special this week) cut using Square framelits (black center also embossed with Boho Chic embossing folder)
  • Upper Yoke (cute right!!) cut with Deco Labels framelits and stamped in Basic Black using the Lighthearted Leaves stamp set
  • I used the Neutral dots for the buttons (tip: if you need alot of Black-use a Black Sharpie pen on the candy dots and it works like a charm.)

Here are the details: (this is a Very pretty card in real life!)
  • Card layers: base is Old Olive 8 1/2" x 5 1/2", then Real Red 5 1/4" x 4", then Whisper White 5" x 3 3/4" the white is embossed with Softly Falling embossing folder
  • Holiday Fancy Foil: 1" x 3 3/4"
  • Old Olive Ornament cut using the Delicate Ornament Framelits. The center is Silver Foil, and the topper is Real Red Foil. I used the Silver Cording Trim for the bow.
  • The stamp I used is also from the Embellished Ornaments


This card is sooo striking! This summer at the Stampin' Up convention in Utah, they explained how Black and Gold were a HOT color combo for this season. After I made this card, I have to agree! Gorgeous!!! I don't know if this picture really captures that!!

Here are the details:

  • Card layers: Basic Black 4 1/4" x 11", the Gold Foil layer is 4 1/4" x 3, the Winter Wonderland Specialty paper is 4" x 2 3/4".  (see below for a great tip to use the Gold Foil paper, before you adhere it, to get the most out of your paper)
  • Christmas Tree: stamped and cut using the Peaceful Pines bundle (page 16 in holiday catalog). I embossed it with Gold embossing powder!! (I used the Itty Bitty Accents punch for the star)
  • I used the Lots of Joy stamp set (from the big catalog page 69, I love that Stampin' Up has Christmas stamps in the big catalog!!) I embossed it with the Gold Embossing powder
  • to keep up with the gold accents I used the Metallic Foil Dollies, and cut it in half (so you can make 2 cards with one!! ) these are on page 148 in the big catalog, if you haven't tried these...try them they are inexpensive and add such a pop!! I used a bow in the Gold Ribbon.
here is the tip I wanted to share, before you adhere the Gold Foil, you can cut stars out, or the gorgeous ornaments out. Since this paper is layered, you won't ever know!!


Here are some pictures of the holiday fun we had:


These girls are crazy!!  :))


a little holiday cheer!


That's me...in the green


sweet lil stamper gettin' into the fun!!


in action!!


Be sure to get your favorites while they are still available! The new Occasions catalog starts Jan 5th, then some of your favorites will be gone....I don't want you to miss out on one you had your eye on!!
Click here to see specials.


Here are the weekly specials:


Built for Free Using: My Stampin Blog


post signature
Saturday Series: Christmas Fry Box fun!!!

I have been having so much fun with the Fry Box!! I think because it comes together so easily and you can just have the best fun decorating them to fit your theme! Today, for my Saturday Series (which I have missed the last couple of weeks, have you missed it too??)   I wanted to share these super cute Christmas Fry Box ideas!!! LOOVVE them!!! See what you think......


Are those to cute or what???


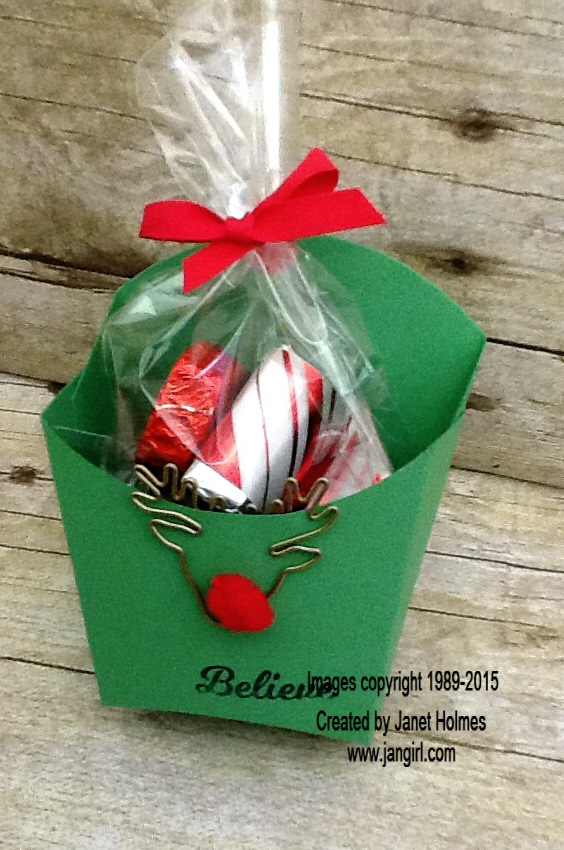
This one turned out so cute and very quick to make!! I used the Cucumber Crush Cardstock for the Fry Box. I used believe from the Jolly Christmas stamp set. The Reindeer Clip is what steals the show here!! It just slides on like a paper clip, and I used the Red Pom-Pom trim to make Rudolph's nose!! I filled my Fry box with Hershey's Nuggets, wrapped in the Holiday Foil Trim! To cover the nuggets, simply use a 1" x 3" piece of paper and wrap around. I secured mine with Tear Tape.


To make this adorable Snowman. I started with the Thick Whisper White cardstock for the  Fry Box. I used the Owl Punch (by the way, the Owl Punch, is one of my all time favorite punches!!) for the eyes and the mouth. I used the Tree punch to make the nose, and trimmed it in half (so you get 2 noses out of 1 tree punch). To make the eyes stand out I used the White Insignia pen. I used Black cardstock to make the hat, and added the bow! How fun is that!!


To make this little Elf Fry box, I looked at alot Elf's on Pinterest and came up with my own. The trickiest part of the little Elf is the collar. I tried a couple different ways to make the collar, and for me using the Square punch at a angle seamed to work best! I cut a strip of Real Red Cardstock  and ran in through the Fry Box Die, just to get the same shape on the collar. Then I took the Square punch and punched at angle and that worked!! I used the Curvy Punch (retired) to make the belt buckle out of Silver Glimmer paper, and added just a scrap of Basic Black in the center and to make the belt. I printed the Elf Pillows on the computer. 

I hope you liked these little fun Fry Boxes, they would make great stocking stuffers, secret santa gifts, teacher gifts, mailman gifts....just about anyone would LOVE to have one of these little cuties!!


Have a great night!


post signature
© Jan Girl · THEME BY WATDESIGNEXPRESS