Showing posts with label tutorial
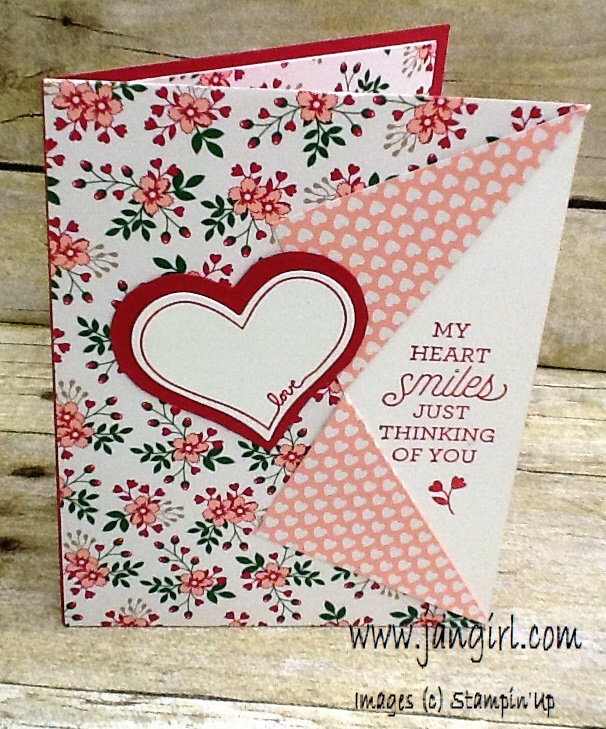
I wanted to share this cute Valentines card I got in the mail today from my friend Kim. She used a couple of my favorite stamps the Hello Life and Suite Sayings stamp set. I just love the collar fold card, it lets the words, kinda peak out, very cute.

See what you think, it's gonna make you smile!!
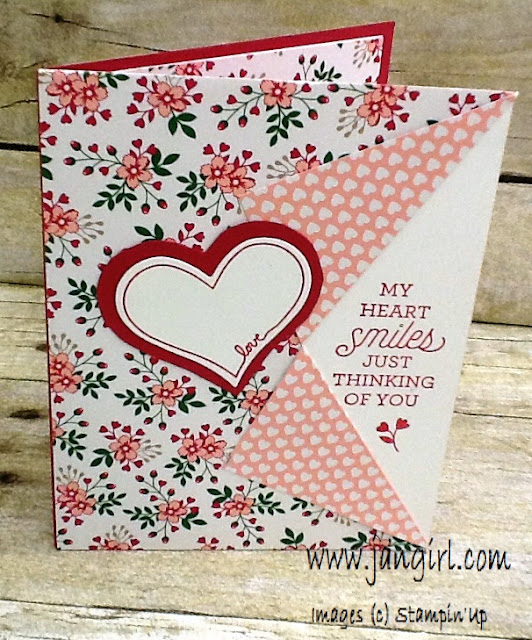


This type of fold is called a Collar fold.  It works best with double-sided designer paper. Once folded as described below, then both sides of the paper are seen. Very Pretty!!!


To make this card, the Designer Series paper measures 4 1/4' x 5 1/2". Cut the paper at the half way point (in this case 2 3/4") use trimmer and cut in 1 1/2". After cutting, simply fold the paper back, being careful to line up the points, and fold back completely. This will kinda remind you of making paper planes when you were a kid! :)) One tip when using this type of fold is to make sure that the sentiment you choose will fit in that allotted area.


Here is a little pictorial for the directions:

Step 1.


Step 2 and 3


Here are the items used:


Built for Free Using: My Stampin Blog

Have a great night!!


post signature
Saturday Series: Bloomin' Heart die and Love                                    Blooms cards and treat box

For my Saturday Series (posted on Sunday.... I spent yesterday doing chores!) :)) I wanted to share these pretty cards and treat box I made using the Bloomin' Hearts die. I just think that the new heart die is so stunning and intricate, it makes you look like a rock star!! I made a Valentines card and treat box, but this heart is not just for Valentine's day, it can have many uses!! Here are my Bloomin' Heart creations, see what you think?? I entered the Anniversary card in the Global Design Team Challenge.


Isn't that just gorgeous!! They all look so cute together!!  Each one of them uses the Bloomin' Heart Die a little different, to create completely different looks!


I hope this picture captures how pretty this card is. When I showed it to my husband, he said WOW, that is really pretty!! We made this in class and everyone loved it. What is great about this stamp set is that you can use words like friend, be mine...not just for couples!!

Here are the details:

  • Card base: Blushing Bride 5 1/2" x 8 1/2" folded in half
  • Layers: Rose Red: 4" x 5 1/4"
                 Whisper White: 3 3/4" x 5"
  • Strips: 1/4" x 3 3/4" of Blushing Bride Glimmer Paper  (so pretty in real life!!) and Love Blooms Designer Series Paper
  • Bloomin' Heart: cut out in Blushing Bride, daubed on edges and here and there with Rose Red I cut the flowers (that come in the Bloomin' Heart Die) with the Blushing Bride Glimmer   paper, and added a glue dot and adhered them behind the flower...I thought this made the flower 'pop', they sort of peek through. I stamped the Bloomin' Love flowers onto thier coordinating flower. ( I love how it all coordinates!!)

    (tip: the flowers in the Bloomin' Love have a 'pointer' on top so you can easily line up..love that!!)


  • Sentiment: I stamped the outline in Rose Red and fussy cut around it, and the 'Be Mine' was stamped in Blushing Bride


How fun is this?? I used the Gift Bag Punch Board to make this. I just made mine shorter, so it really made a box! I used the Medium guides on the Gift box punch board. On this one, I just cut the heart out of Rose Red and just layered it. Did you notice the flower embellishment?? It's on page 27 of the new Occasions catalog! It added a little extra sparkle here!!


Is this sooo pretty? I made this card for my Brother's anniversary. Their wedding colors were pink and black, 27 years ago!! (he married my friend and college roommate, how lucky did I get??) I used a couple new products on this card, can you guess how many? (answer at the bottom of this post). I really liked this card so I entered it in the Global Design Team Challenge this week which is Love this week.

GDP019


Here's a closer view.

Here are the details:


  • Card Base: Basic Black 4 1/4" x 11" folded in half
  • Layers: Blushing Bride 4" x 5 1/4", Whisper White 3 3/4" x 5" (I tore the bottom to add interest, plus I adhered it crooked!! ) I am telling all my secrets!!  ha-ha!!
  • I cut the Bloomin' Heart out and then just placed in back in place, like a puzzle with all the intricate pieces showing through!! This turned out very elegant!
  • I used the Timeless Love stamp for the sentiment, I stamped that on the Perfectly Artistic Designer Series paper (a Sale-a-bration paper that is FREE right now, until Feb 15th)
  • I added a piece of the White Organza ribbon and a flower jewel (Botanical Garden Jewel)
  • To add a little bit more jazz..I used the Wink of Stella around the egde of the Heart, this really creates a subtle but striking shimmer!! WOWZA!!
I hope you have enjoyed today's cards and treat box. Please be sure to check back on Saturday's, I like to take one product and show it in a couple different ways!!

Here are the products I used:


Built for Free Using: My Stampin Blog


Click here to order. Remember if you place a $50 order, you will receive a Sale-a-Bration item free!! I will also send you the cards for FREE that we made in our card class this month!!! You don't have to email me, I will get your address off your order!! Thank you for stopping by today!

Now if you guessed 4 on the the question above your were right! I used the Bloomin' Heart die, the Wink of Stella, the Perfectly Artistic Designer Series Paper, and the Botanical Garden Jewels!

Have a great day!!!

post signature

I wanted to share this fun card that uses a slightly different fold. I used a couple of different stamp sets that really complement each other. I used the Garden in Bloom and the Tin of Cards stamp set. This fold really helped this card stay simple.


My goal on this card was to create a perfect that would hold the funny squiggly design from the Tin of Cards as a border. If you look at the Tin of Cards stamp set (on page 110) the fun squiggle design is about 3 1/2 inches in length. I wanted to use that as my border.


So I first stamped the 'Hello'


Then I used a small post-it note to cover my 'Hello' and then stamped the squiggle line over my post-it note, as shown below.


Then when you remove the post-it note, perfectly stamped around the wording!! I then just stamped the squiggle line around the rest of the Whisper White.  Kinda cool right??


To finish off the card I stamped the flower and the bee from Garden in Bloom. This stamp set is a two-step stamp set so you can get a layering of colors. The little bee just makes me smile!!

Details on card layers:


  1. Card Base: 9 3/4" x 4 1/4", scored at 4 1/4"
  2. Old Olive layer: 4" x 4"
  3. Whisper White layer: 3 3/4" x 3 3/4" 
  4. English Garden Designer Series paper 1" x 4 1/4"
Here are the items I used:


Built for Free Using: My Stampin Blog


Thank you for stopping by today!! click here to order, if you use hostess code GAD7YNF4 
I will send you FREE our 4 club cards we made this month, when your order is $30.00

Have a great night!


post signature
Saturday Series: Painted Blooms Designer Series Gate fold card, Gift bag, and treat pouch


For today's Saturday Series I wanted to highlight the awesome Painted Blooms Designer Series Paper!! I just LOVE this paper....but it's leaving so get yours while you can. So I used different sheets on all three of these projects. I hope you enjoy!!


Is that paper gorgeous?? or what!! The gate fold card we are making this month in class, it's a slightly different gate fold. It closes completely, giving you plenty of room to write your message.


The Silver embellishments (the Silver Foil Sheets and the Silver ribbon) just go perfectly with Soft Sky.


I layered the Butterfly Die, with a Silver Foil Butterfly punch. Very pretty!!


I stamped the Tulips on the inside of the card, the Painted Petals stamp is a perfect match for this paper. I first stamped the stems in Wild Wasabi and then used Rose Red, Daffodil Delight ,and Soft sky marker on the tulip tops.


What's great about this card is that it has plenty of space to write your message. The measurements are 4 1/4 x 11, and scored at 2 3/4, turn paper and score at 2 \3/4.   I hope you like it!!


For this sachet bag, this full print sheet in this pack of paper works beautifully here!! It does all the work...all you have to do is cut and score!!


I found a the directions for this bag on Crafty Caroline Creations. I tried to make a youtube video, but I had technical issues!! Anyway the measurements are start with a piece of Designer Series Paper 10 1/2 x 8 1/4.Then you score on the long side (10 1/2" side) at 1/2", 2", 5 1/2" and 7". Then score on the short side at 1 1/2". Cut up to the 1 1/2" score line and use your bone folder to make sharp creases. The bag then just folds up easily. One tip I have is I knew this part of the paper is where I wanted the front of my bag, so just look at your paper, before you score so you pre-plan your front part of the bag!


This sweet little candy pouch is too fun and cute. Every month our group gets together and we swap cards, 3D items. I received one similar to this from my Upline's Upline, Sharon Cheng.  This little treat holds a candy just perfectly.


Who wouldn't want to get this little guy!! TOO fun and cute! Right up my alley!!

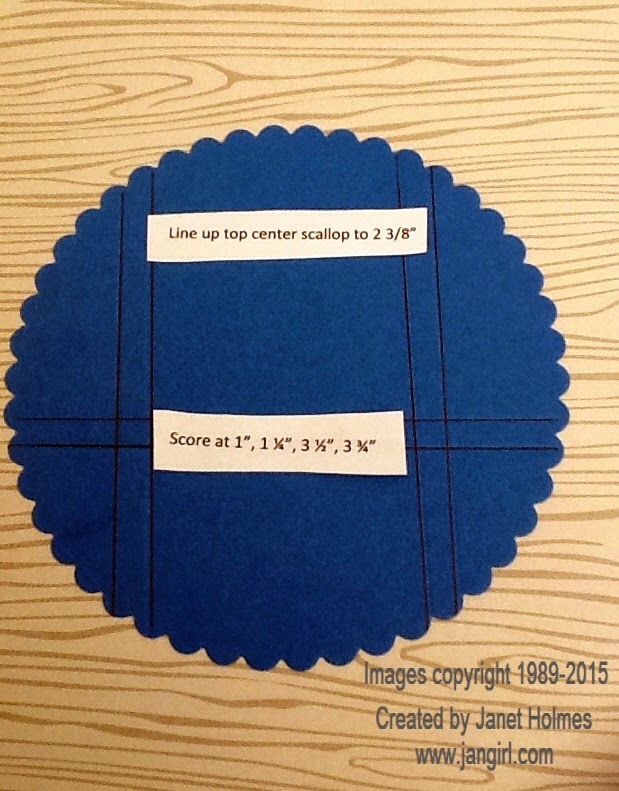
Scallop Circle Treat how to:


  • Cut a scallop circle using the Circle Collections Framelits.
  • Line up the top center scallop at the 2-3/8" mark on the Simply Scored board.
  • Score at the 1", 1-1/4", 3-1/2" & 3-3/4".


  • Turn the circle 90°.
  • Score at the 2-3/4" & 3" marks.


  • Trim off the corner pieces at the inner-most score lines.
  • Fold on the score lines, but do not adhere together yet.


  • Cut a 2-1/4" x 5" long piece of DSP.
  • Die-cut the rounded edges with the Circle Collection Framelits.
  • Cut the strip in half, so you get 2 from one cut!!! 
  • Adhere to the inside of the box as the liner. 
  • Adhere the box flaps with Sticky Strip.   


I hope you feel inspired today!!

Here are the supplies I used....be sure to make sure you get the Painted Blooms Designer Series Paper!! click here to get your favorites!! Please use HOSTESS code 39J9JZQU.  

I will have a drawing for $25 FREE out of the new catalog for every order that uses this hostess code!!!


Built for Free Using: My Stampin Blog


post signature
Monster Monday: Fall Fest Treat Pouch

Every Monday I have been doing a fun blog post called Monster Monday that has ideas for  Halloween treats, cards, and scrapbook pages!! I will be doing this until the last week of Halloween...just to scare up some fun!!! So I made a quick and easy treat pouch, that you could easily change up for any holiday! I used the Fall Fest stamp set and Framelits, I also used the stamp set from September's Paper Pumpkin.


Here's my cute little pouch: (directions at bottom)


I made this for my Secret Santa at work, I know....it's a little early. This year we decided that we could give early, so I came up with this little pouch.


It holds a regular sized candy bar, this would make a great Christmas gift, teacher gift, the uses are endless.


Directions:


  1. cut paper to 3 1/4 x 11 1/2 ( Smoly Slate)
  2. score at 5 1/2, and 10 inches
  3. fold on score line, use scallop border punch on top edge
  4. stamp pumpkin in Tangerine Tango, and use Old olive marker for the stem cut out with framelit
  5. cut out ghost with Fall Framelits in  Whisper White and use wiggling eyes
  6. stamp sentiment from Sept 2014 paper pumpkin, in Memento Black pad
  7. use star punch with Silver Glimmer 
  8. to put the pouch together, staple under the flap on both sides and near the bottom. (tip: I used my Stampin' Up Stapler, but any will work, staple first then adhere Designer Series Paper, so the staples are hidden under the paper. (I used the Monster Motley Designer Series Paper cut at 3 x 3 1/2)
  9. The tag: is 3 x 2" and just added a strip of the Monster Motley Designer Series Paper) the tag was also stamped with the Sept 2014 Paper Pumpkin. The ribbon on top is Pumpkin Pie cotton ribbon.

Have a GREAT  day! Thanks for stopping by, and if you know my Secret Santa at work....remember this is a secret!!  :))


Janet Holmes


Monster Monday: Halloween Tag treats and tutorial

Halloween is just one of those fun times of the year, I get all excited when I start seeing candy and all the goodies at the store. I wanted to share these sweet and simple treats that you can make over and over again for all the little goblins in your life! Every Monday till Halloween I will share some ideas to help you brew up a little fun on Halloween.


Are these little guys cute or what?? I made them all using the Angled Tag Topper punch. I will have directions for each at the bottom. Each one had a bite size candy bar in them!  Can you tell which one of these was made with a 'Christmas' item?


\

I really think he turned out cute!! What Halloween would be complete without a little Frankenstein?


He almost looks like 'Alfla' here with the ribbon...ha-ha!


The ghost is so sweet here! just know some trick-or-treaters would LOVE to get this!!


I like the eyes ......


Of course, there had to be a witch!!


I really like how the hat turned out here.  So did you guess which one was made with a 'Christmas' item??? If you guessed the Witch, you were right!! The hat is the new Tree Punch!!

Here's the details so you can re-create:


  • all are cut at 2" x 8 1/2" scored at 4 1/4
  • use the Angled Tag Topper on both ends
Frankenstein:
  • Old Olive for base
  • hair was 2" x 2 1/2" I used the fringe scissors and cut a different angles to get all the cuts
  • Eyes: larger eye: 3/4" circle punch, smaller eye used owl punch
  • Pupils: owl punch
  • stamp: Black Staz on Ghoulish Greeting stamp set
Ghost:
  • Tangerine Tango for base
  • Ghost cut out of Whisper White with Fun Fall Framelits
  • eyes : small wiggle eyes
  • Stamp: Black Staz on with Holiday Invitation stamp
  • Trim: White and Tangerine Tango Two-Tone Trim
Witch:
  • Rich Razzleberry for base
  • Hat: Basic Black cardstock, cut with Tree punch, and about 1/3" black strip cut in angles on end, small strip of Motley Monsters Designer Series Paper used. I also embossed the hat with Lucky Stars Embossing Folder and daubed Whisper White craft ink on it.
  • Tag: made with Crushed Curry, using the Tee-Hee_Hee stamp set, and Banner punch
  • For the star I used the star punch out of the Silver Glimmer Paper

Have a great day!!

Click here to order to get your spook on!!  :))

Janet Holmes


Stampin' Up Halloween gift bags

in , , , by jangirlstamps, 11:25 PM
I wanted to share these cute little gift bags for Halloween. This is a sneak peak a the new holiday catalog. This little bag can be changed to fit any holiday or occasion. I made these for our monthly demonstrator swap! They were a hit. I put a small Hershey bar in them.


Do you love the thick twine? The holiday catalog is FULL of incredible stuff. If you need a copy, just let me know.


These are pretty quick and easy to whip up.

Here's how to make them:

Simple Bag:

  1. 6 x 6 card stock or Designer Series Paper
  2. Scored at 1 inch on 2 sides, turn paper and score at 2 ½ and  3 ½
  3. Cut on 1 inch scored side to scored mark, apply adhesive to 2 small flaps and 2 longer flaps
  4. Make sure squared off when a folding up sides, then squeeze top together, I  put folded circle  form 2 1/2/ circle punch on top. 

Have a great day!

Janet Holmes
I wanted to share this adorable little Owl gift bag I made. I just love him!! You know when your making something and you just wanna squeal, well that's how this was for me!! The base of the Owl is made using the Top Note Die and the eyes are made using different circle punches. (see tutorial at the bottom) And I think this little gift bag would make anyone happy!!


Is he sooo cute?? Part of the tag is a sneak-peak of a new stamp set out of the catalog coming out in June! I thought the 'woo-hoo' was perfect!!


Do you love his little hair feathers, cut with the Fringe Scissors!  LOVE THAT!!


I made these for our monthly Demonstrator swap! We meet once a month and swap cards, 3-D items and we either do a technique or a make-n-m take. I really love how fun and how we share, I so enjoy these girls, they are some of my best friends. If you ever want to join, let me know. We meet in the Ft. Worth area, but if you can still swap and be involved from a distance!


 Guess whooo's looking at you ??  ha-ha!!


So here's how made this little guy:


Have a great day!!

Janet Holmes


When I realized that the Scalloped Tag Topper makes a perfect shadow to the Chalk Talk Framelit, I about squealed! What a GREAT combination!! So if you cut your paper at 3 1/4"  x 2" and punch the Scalloped Tag Topper on both ends,  it will be a perfect shadow for the Chalk Talk Framelit.

Here's a little Diagram:


Is that awesome. I love it when I can use one tool many ways.... It makes me do the happy dance!!


So this is my card, I really like how it turned out!!


Doesn't that make such a cool frame around the Chalk Talk Framelit? I can see many uses for that!! My mind is just spinning.....  :)


Items used:
Stamps: Chalk Talk (this is one of my favorites, it's a good one)
Paper: Modern Medley Designer Series Paper, Coastal Cabana cardstock, Strawberry Slush cardstock, So Saffron cardstock, Very Vanilla cardstock, Basic Black cardstock, Old Olive cardstock
Accesories: Petite Petal Punch, Scallop Tag Topper punch, Chalk Talk Framelits, Boho Blossums Punch, Bird Punch (the leaves), Rhinestone


Have a great day!! Click here if you want to order!!

Thanks for stopping by!!

Janet Holmes


© Jan Girl · THEME BY WATDESIGNEXPRESS