Showing posts with label punches
Saturday Series: Curvy Keepsakes Easter Eggstravaganza


For today's Saturday Series I thought I would share some crazy cute Easter treats that I have been making using the Curvy Keepsakes box. These are so cute, they are sure to bring a smile to everybunny.....ha-ha!!  I made a little Easter set, a bunny, and chic and a little treat (using the Curvy Keepsakes in a whole different way!!). If you need some Easter treats to fill up those baskets, grab a Curvy Keepsakes die and come on!!!


Are those so stinkin' cute or what???


This is so precious!! Just makes me smile!! To make the chic I used the large scallop die for the feathers, and just layered them . I used the Owl Punch (one of my favorite punches) for the eyes, the beak I just cut. The feathers on the side are made using the Flower Medallion Punch. I tried a couple different ways to make the feathers, this worked the best. I cut the Medallion flower in half and then just scored about 1/4', this allowed me a way to attach them. The 'top feather' is a piece of Daffodil Delight Seam binding Ribbon that I frayed and tore to make it look like a feather. What so you think??


He's a little cutie!!!


For this little treat I just the more rounded part of the Curvy Keepsakes. I cut 1/2" off both bottom bases and adhered them together, this created a more enlongated box. I just LOVE the Best Year Ever Designer Series paper (***this is the last couple of days that you can get this paper for FREE with a $50 order**). This paper is absolutely PERFECT for Easter. I used the 1/2" circle punch. I used the February Paper Pumpkin cello bags, and topped it off with Bermuda Bay 1/8" Taffeta Ribbon. The little tag is from Teeny Tiny Wishes stamp set.


How fun is that?? I put Easter colored candy corn in the liitle bags!! Super fast to make!!! If you have a lotta bunnies to make treats for....this is a gonga!!


Here's the sweetest little bunny ever!! He is my hubby's favorite!!

Here are the bunny details:

Ears:  Scallop Oval, Large Oval (I trimmed a little off the bottom of the oval)
Bow: Bow punch (a new favorite!!)
Eyes: Owl punch, little comma is made using the White Uni-ball Signo Gel pen
Nose: Itty Bitty Accents Punch Pack
Cheeks:  1/2" circle punch, black dots made using the Black Stampin' Write Marker,
Whiskers:  I took the White Jute Ribbon and pulled it apart to get individual strand, I used a glue dot to hold in place. I think that you could use White Baker's Twine, but this White Jute Ribbon is more stiff...like whiskers!!
Mouth: Owl punch


Last butt not least..... (ha-ha no pun intended!! the tail....) hee--hee I think my blog just turned X- rated!!   AHH!!  :)


WHAT???? this is well...... maybe the best part!! I used a rose from the Artisan Embellishment kit!!  LOVE IT!!!


Last week I was picked as a TOP 3 for a challenge with Create with Connie and Mary!! How fun is that!! YIPPEE!!

OCC15Top3


Here are the products I used:
Built for Free Using: My Stampin Blog


Have a great day!! Click here to place your order, only a few days left till sale-a-bration is over!!



post signature
I wanted to share  a super fun  card I made using the stamp set Kinda and Cozy! I just LOVE making these little  watermelons....I  don't know what that says about me!!! :) The Back to Black Designer Series Paper just complements this so well!! It's a perfect match. So this card I made for the Create with Connie and Mary sketch challenge #CCMCSU14-03.


Here's the sketch:


:


Here's my card:


Is that super sweet? i really like the combination of papers, gives lots of color!


This little card would perk up any one's day!!


I wanted to point out a couple things about this little card. First, the sentiment I used the circle card banner to cut it out. The Strawberry Slush behind it is from the Project Life Framelits,  it was perfect to stack on each other. Also the gingham circle was punched with the 2 1/2" circle punch, the Strawberry Slush center is cut with the 1 3/4" circle punch. The seeds are from the candle flame on the cupcake punch. The "bite" is the 1 3/4" scallop punch.


What do you think? It's a pretty happy card. :) This is my first card to make with angles like this, very cool! Thank you Connie and Mary for this fun little sketch! If you haven't ever tried to make a card from a sketch, you should give it a try. It will stretch you and push you out of your comfort zone!


SummerTop3

I was a top 3 pick a couple weeks ago from Create with Connie and Mary....what an honor.

Have a great day!! Don't forget to take advantage of the buy 3 get 1 FREE Designer Series Paper, click here to order!


Janet Holmes


I haven't posted for a couple days my son is getting ready to leave for Flight training in the Navy and well mommas a little sad and trying to enjoy every minute!!  :)  But I wanted to show you these super cute Ghirardelli treat  I made using the Kind and Cozy Stamp set. They are ridiculously adorable!! I used the Angled Tag Topper Punch to quickly put together. See FREE tutorial at bottom of post.


I made these as little gifties for everyone who attended my class last week. Aren't those cute!! This is made using a stamp that initially you might think ....what ? watermelon? My mom and I have painted in the past and and well to me its a perfect watermelon!!  :)  This is a great example of how to make a stamp set to have MANY different looks!! To me that will make a set valuable, so here's that stamp set. It's on page 12 in the new catalog.


UNSET


Kind & Cozy Clear Stamp Set129126
Price$16.95

Mason jars are all the rage, and with this clear mount set, you're ready to declare your domestic goddess status (and your stamping prowess) with whatever you put in the jar. It even coordinates with the 2-1/2" Circle punch for perfect circles every time. 


The colors are perfect! I used the Back to Black Designer Series paper (to me it kinda looked like watermelon seeds.... ok...maybe only to me! ha-ha!!)


Here are the details:


  1. cut Back to Black Designer Series Paper to 2 " x 6, score at 2 7/8" and 3 1/8"
  2. Use Angled Tag Topper on the ends
  3. Stamp Kind and Cozy gingham circle in Old Olive and use 2 1/2" Circle Punch
  4. Use 1 3/4" Circle Punch to cut Strawberry Slush, cut watermelon into quarters
  5. 'seeds' are from the  flame on the Cupcake Punch
  6. stamp sentiment from Six Sided Sampler, and I used the banner from the Circle Card framelit
  7. apply adhesive on inside, to hold candy, I taped the candy wrapper to just keep tidy
  8. thread Strawberry Slush thick Baker's Twine.

Have a great day!! We are hitting 100 for the first time this summer today....I just may have to have some cold watermelon!!  :)

click here to order!!

Thanks for stopping by!!

Janet Holmes


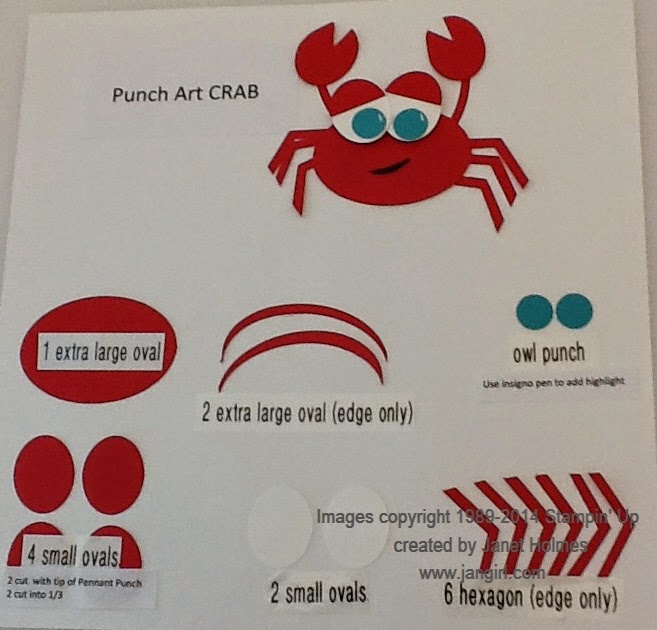
I have been dying to make this little crab! I have seen several different one's on Pinterest, so I incorporated several and came up with this cute little guy! He is so stinkin' cute!! WHAA!! I used 2 different challenges for this card, I knew when I saw the sketch from Create with Connie and Mary and Freshly Made Sketches, that I was gonna..... get busy!! I really like the way this little crab card turned out. I put a FREE tutorial at the end.  :)


So here's my card:


Is he too cute... or what?


I used the new Flashback Designer Series Paper to make the back ground of this card. I is just a happy little card. I don't know about you, but sometimes I get a little crabby and this little fella sure would perk me up! :)


The Taffeta Ribbon is one of my favorites, it just a little element that ties in all in. I popped up the eyes and the word bubble. On the eyes I also used the uni-ball Signo gel  pen to add a little sparkle.


Crab Tutorial


Items used:
Stamps: Hip Notes
Paper: Flashback Designer Series Paper, Real Red cardstock, Bermuda Bay cardstock, Whisper White cardstock, Basic Black cardstock
Accessories: Hexagon Punch, Extra Large Oval Punch, Small Oval Punch, Owl Punch, Uni-ball Signo gel pen, 1/8" Taffeta Ribbon, Pennant Punch


Have a great day! Click here to order!!

Janet Holmes


I wanted to share this adorable little Owl gift bag I made. I just love him!! You know when your making something and you just wanna squeal, well that's how this was for me!! The base of the Owl is made using the Top Note Die and the eyes are made using different circle punches. (see tutorial at the bottom) And I think this little gift bag would make anyone happy!!


Is he sooo cute?? Part of the tag is a sneak-peak of a new stamp set out of the catalog coming out in June! I thought the 'woo-hoo' was perfect!!


Do you love his little hair feathers, cut with the Fringe Scissors!  LOVE THAT!!


I made these for our monthly Demonstrator swap! We meet once a month and swap cards, 3-D items and we either do a technique or a make-n-m take. I really love how fun and how we share, I so enjoy these girls, they are some of my best friends. If you ever want to join, let me know. We meet in the Ft. Worth area, but if you can still swap and be involved from a distance!


 Guess whooo's looking at you ??  ha-ha!!


So here's how made this little guy:


Have a great day!!

Janet Holmes


When the Sale-A-Bration catalog came out, I was so excited about the See Ya Later Stamp set, I could hardly stand myself!!The little alligator is such a little cutie! I have to warn you, you may be seeing alot of him!! ha-ha!! The See Ya Later stamp is full of  a variety of really cute sayings!!

keep calm 4 days to go

Are you having fun with the countdown??  There's been a couple of you who have contacted me and said how fun it was!!  :))

So onto todays' card:


Is that cute or what? I got this idea from one I saw at the idea boards at leadership a couple weeks ago. I thought it turned out really cute!! The Wiggly eyes are on the clearance rack for .99,  for a whole sheet of them! How great is that!!


If you're wondering about the zig-zag around the circle, that's the new Starburst Thinlit. I thought it looked pretty cute here....like jagged teeth...well sort of.

There is actually several Sale-A-Bration items used on this card, can you guess how many??
(answer at the bottom of this post!! )  :))


Items used:  
Stamps:  See ya Later (Sale-A-Bration)
Paper: Sahara Sand cardstock, Gumball Green cardstock, Summer Starfruit cardstock, Whisper White cardstock, Sweet Sorbet Designer Series paper (Sale-A-bration)
Accessories: Pennant Punch, Owl punch, wiggly eyes, Starburst Thinlit, Summer Starfruit Twine (Sale-A-bration),  Decorative Dots Embossing folder (Sale-A-bration)

If you guessed 4, on the number of Sale-A-bration items you guessed right!! Again those are 4 items that could be FREE for you! During Sale-A-bration  for every $50 you spend, you will get an item FREE out of the Sale-A-bration catalog!!!  That is awesome!! Who doesn't like FREE stuff? especially when it's cute!!!

Have a great day!!

Janet Holmes


I wanted to share a cute Valentine treat with you, that I made using the new Scallop Tag Topper Punch and the Angled Tag Topper Punch.You know when you get a new catalog and you know right away what you're gonna get, well that's how it was for me with the new Scallop Tag Topper Punch. This punch allows you to cut out a tag at ANY length!! So the possibilities are endless like bookmarks, for scrapbook pages and treats. So here is a treat made I made using the new punch. I got this idea from our FREE Stampin' Success magazine, this is one of my favorite perks of being a Stampin' Up demonstrator,it's just full of ideas!! Love it! Mine is a little different than the one they showed, I really love it!!


Pretty cute huh?? I put Hershey kisses inside.  Did you notice the new Gold Baker's Twine, it just sparkles on top. Since this new punch has a scalloped edge on top, I used the scalloped heart from the Hearts a Flutter Framelit to  compliment each other. What do you think?


The 'love you' is from itty bitty banners.


This next Valentine treat was an idea I cased from Mary Fish, using the other new punch topper, it's called the Angeled  Tag Topper Punch. I had these as treats at my class on Tuesday night. This is a very fast and simple treat.


I really liked how these turned out. This is a great idea for a quick treat you might need for a classroom, baby shower, anytime you need a simple quick treat!  (like now!! ha-ha)


This one holds a yummy Ghiradelli chocolate! I used glue dots on the candy wrapper to fold it back, so it looks neater. I used the new Watercolor Wonder Washi Tape to add some pizazz! 

Here are the instructions:

Scalloped Tag Topper Punch Treat

1.   Cut Real Red Cardstock  2” x 6”
2.   Score at  2 5/8, and 3 7/8
3.   Punch both ends of paper using the Scallop Tag Topper Punch
4.   Fold on score lines and secure kisses with glue dot
5.   Stamp heart from Hearts a Flutter in Crumb Cake ink onto Whisper White Cardstock
6.   Stamp ‘love you’ from Itty Bitty stamp set and cut out using the coordinating Itty Bitty Framelits
7.   Use dimensional on “love you” and rhinestone, secure top with Gold Baker’s twine


  Angeled Tag Topper Punch Treat


1.   Cut Whisper White to 2” x 5 ½”
2.   Score at 2 5/8 and 2 7/8
3.   Use Angeled Tag Topper Punch on both ends of paper
4.   Put Watercolor Wonder Washi tape on and  cut or tear
5.   Add heart cut from Red Glimmer Paper, cut with Small Heart Punch
6.   Secure with Gold Bakers Twine 


Scalloped Tag Topper Punch133324
Price$22.95
Make a tag or topper any length you want! Makes creating bookmarks, tags, and bag toppers quick and easy.

Punched image width: 2"


Angled Tag Topper Punch133323
Price$22.95
Make a tag or topper any length you want! Makes creating bookmarks, tags, and bag toppers quick and easy.

Punched image width: 2".


Click here if you want to order the Angled Tag Or Scalloped Tag Topper Punch

Have a great day!!


Janet Holmes

When I first saw the Kind and Cozy Stamp set, it reminded me of a watermelon that me and my mom had made with painting. When I did this in class, I realized not everyone saw a watermelon....Ha-Ha!!
So here it goes


 can you find where the owl punch was used?? I took this card for my SUDSOL swap at convention. I just loved how it turned out!!


Notice the seeds in the watermelon? They are the heart in the owl punch, cut in half. This is a trick I learned from my mom, years ago! Super cute!! Here is the Summer scrapbook page we made in our monthly first Saturday Scrapbook day!


Now if your wondering where is this watermelon from?? It is the gingham circle and center circle from the  Kind and Cozy stamp set. Basically I stamped the gingham circle in Old Olive and the inner circle in Melon Mambo.  I used the 2 1/2" circle punch to cut out the gingham, and cut the inner circle with the 1 3/4" circle punch. I then cut it in half, and one half I cut into quarters. I made the "bite" with the  1 3/4 scallop punch. This makes a great Summer time scrapbook page.


For Watermelon Card and Scrapbook Page
Stamps: Six- Sided Sampler, Kind and Cozy
Paper: Old Olive Card Stock, Basic Black Cardstock, Garden Gingham Designer Series Paper
Accessories: Owl Punch, 2  1/2" Circle Punch, 1 3/4" Circle Punch, Scallop Punch, Ribbon, Large Scallop from the circles thinlits, Versamark
   (the text Summer was made using My Digital Studio)


Have a great Day!!

Janet Holmes

Tool Tuesday: Owl Punch
Owl Punch
I know the owl punch has been around awhile, but it is such a versatile tool! If you have ever been to one of my classes then you know, we USE it! :)) It has various sized circles to make eyes, and other shapes. On the main body you can cut the ears off, the feet off, change the feet color. You are pretty much limited to your imagination.


I wanted to share this Owl Punch idea board I made up about a year ago! What fun! So this is the Owl Punch used many ways, with extra punches, legs trimmed etc. My favorite, is the chicken! Which one is yours???


What I LOVE about this punch is it's versatility. Tomorrow I will show a card and a scrapbook page using the owl punch, along with some other punches.Super cute! If you want details on how I made each one, let me know.

Click here if you would like to order the Owl Punch!


Have a great day!

Janet Holmes


Stampin' Up Mosaic Madness

in , , by jangirlstamps, 12:18 PM
This card is so cute to me! I saw it on Jill Hillards blog and feel in love! The new Stampin' Up colors are fabulous! Really they are easy on the eyes and blend so nicely together,.


I really like the Mosaic Madness used like a border. I can see Christmas cards made the same way. The way I made the stem was to use 2 of the Oval Framelits, and it turned out. Wow another idea with the Oval Framelit.


Super cute! I am also in LOVE with the new buttons!! Right up my alley.
 
Have a great day!!
 
Janet Holmes
 
Items used:
 
Cardstock: Baked Brown Sugar, Strawberry Slush (sounds good huh!) and Very Vanilla, Old Olive
Stamps: Mosaic Madness, Really Good Greetings
Accessories: Bird Builder Punch (for leaf), Blossum Punch, Oval Framelits, Very Vintage Buttons, White Bakers Twine, glue dot
 
© Jan Girl · THEME BY WATDESIGNEXPRESS