Showing posts with label Cards

Stampin up Thoughtful Branches

in , by jangirlstamps, 9:58 PM


I wanted to share these Thank you cards I made using Thoughtful Branches. This stamp and die set are so versatile. It is only available until supplies last. If you just look al over Pinterest, you will see tons of ideas, don't let this one pass you by!! It's a keeper!!


 I stamped the lower part of the flower in Blushing Bride, then stamped the upper part in Watermelon Wonder. I kinda chuckled to myself when I embossed the Softy Falling dots.


I hope you have a wonderful day, click here get the Thoughtful Branches before its gone for good!!



post signature
I wanted to share this card I received using the Botanical Builders framelit and  Rose Wonder stamp set. This  Botanical Builder set is available as a bundle right now in the Occasions catalog. This set is a so pretty and versatile and honestly makes cards that look so impressive, but are pretty easy!! How awesome is that!?!


I received this from my friend Jen. I LOVE the colors!! One of my favorite things about this card is the enamel dots is the center of the flower, really sets this card!! Be sure to get this AS A BUNDLE, while you can. You can order this as a bundle until JUNE 1st!!

Thank you for stopping by!


Have a great day!


post signature

Stampin' Up You're Sublime Leap year card

in , by jangirlstamps, 9:53 PM
I have to share this card I made for Leap year that is gonna make you crack up. I just love the You're Sublime stamp set, it just makes the cutest cards. I think this card will get you 'jumpin' for joy!!'  ha-ha!!


Is that crazy cute or what!!??  I hope it brought a smile to your day, this day only happens every 4 years,  so why not make a fun card!!

To make the frog, I used the Aqua Painter and Cucumber Crush ink. I took the ink pad and squished the pad while closed, to get just a little ink on the inner lid. Then I used the Aqua Painter (that I filled with water) and gently applied the ink on the frog. You can add as little ink or more for a darker color.

To make the fun little saying....I know you thought that was in the book, you were like where is that stamp??  :)) I combined 2 stamp sets and used the alphabet to make this fun saying!! I just love how you can create your own sayings!! How fun is that!!


Have a fun leap day!!

Here are the items I used:


post signature

Stampin' Up Enjoy the Little Things

in , by jangirlstamps, 11:32 PM

I wanted to share this cute card I made using the Enjoy the Little Things stamp set. Just saying the name of that stamp set makes me smile!! I think this card would bring a smile to anyone's day!!


Did it make you smile?? I hope so!! 


I used the Dazzling Diamonds Glimmer paper here to add that extra sparkle. I cased this card from Ronda Wade, I just thought this was the cutest!! This card also packs a big saying....just enjoy the little things, sometimes we get so busy and caught up in our lives, it's nice to just sit back and breathe.

Here are the items I used:


Built for Free Using: My Stampin Blog

Have a great day! 


post signature
Here's a card I made for my Sister-in-Law. She sent us a lap quilt for the holidays, and I knew right away I was gonna make her a card using the Love You Sew stamp set. This is the cutest stamp set, good for all kinds of crafters! I used the sketch from Create with Connie and Mary this week CCMC389.

CCMC389

Here is my card:


Is that cute or what??


I think it turned out perfect! The new Baker's Twine just balanced it off.

Here is my hubby wrapped up in the quilt, he is half way through his Chemo treatments, so the quilt is perfect for him to snuggle in.


Here are the items I used:


Built for Free Using: My Stampin Blog

Have a great day!!


post signature
 I know if you have been following my blog, you have been wondering about my absence! Where is she??  Our world has been a little crazy, like life just gets sometimes!! It will make more sense, when I share this card I made. I will be honest, I feel in LOVE with this stamp set when I first saw it!! It is so cute!! It has several different dinosaurs and their bones,  and our family has all boys so this is a stamp set that was a must have!! However, when this stamp set came out, this type of card was not on my radar....life threw us a curve ball!! But I really like how this card turned out, this card is for my husband who has just completed  10 weeks of radiation. He has had 2 surgeries and starts chemo in a couple weeks. So this little card is meant to cheer him up and  I hope it does just that.


Pretty cute, right? It kinda says it all!!!


To make the 'x-ray' part of the card, I first tried using the Craft White Ink, which was nice, but kinda light and not the 'pop' I was looking for. So then I tried embossing with White Embossing powder, and I liked the look much more!! I had to add the heart (from the Owl Punch) because he is my sweetie!!! :))

So this stamp set could be used for someone who broke a leg or arm or something too, just another idea.

Thanks for stopping by!! Don't be a stranger, I will be posting more! Ok
Have a great night!

Here are the items I used:


Built for Free Using: My Stampin Blog


post signature

I wanted to share this fun card that uses a slightly different fold. I used a couple of different stamp sets that really complement each other. I used the Garden in Bloom and the Tin of Cards stamp set. This fold really helped this card stay simple.


My goal on this card was to create a perfect that would hold the funny squiggly design from the Tin of Cards as a border. If you look at the Tin of Cards stamp set (on page 110) the fun squiggle design is about 3 1/2 inches in length. I wanted to use that as my border.


So I first stamped the 'Hello'


Then I used a small post-it note to cover my 'Hello' and then stamped the squiggle line over my post-it note, as shown below.


Then when you remove the post-it note, perfectly stamped around the wording!! I then just stamped the squiggle line around the rest of the Whisper White.  Kinda cool right??


To finish off the card I stamped the flower and the bee from Garden in Bloom. This stamp set is a two-step stamp set so you can get a layering of colors. The little bee just makes me smile!!

Details on card layers:


  1. Card Base: 9 3/4" x 4 1/4", scored at 4 1/4"
  2. Old Olive layer: 4" x 4"
  3. Whisper White layer: 3 3/4" x 3 3/4" 
  4. English Garden Designer Series paper 1" x 4 1/4"
Here are the items I used:


Built for Free Using: My Stampin Blog


Thank you for stopping by today!! click here to order, if you use hostess code GAD7YNF4 
I will send you FREE our 4 club cards we made this month, when your order is $30.00

Have a great night!


post signature

Stampin' Up Acorny Thank You card

in , by jangirlstamps, 11:35 PM
I wanted to share this cute card with you from the new stamp set that is just tooo cute, Acorny Thank You stamp set. In the last few weeks we have had  alot of family in and this is one of the cards my Sister-in-Law made, and I just love it. She did an awesome job!! The Woodland textured embossing folder just makes this card, see what you think.


Is that cute or what?? The acorns are attached to the Gold Cording Trim by a glue dot, so they kinda swing. How fun is that?? I love the little touch of sequins, just finishes it off!  To get the trees to stand out, we lightly daubed the tree trunks with Soft Suede, it just makes them pop!! The Acorny Thank You stamp coordinates perfectly with the Acorn punch, and they come in a bundle to save 15%. How much better can it get??  :))  When people ask me, what I LOVE about Stampin' Up, well honestly it's products like this, cute stamp sets that have punches or framelits that make it so simple to make an adorable project or card.


One thing I really like about the designer series paper in the Holiday catalog is not only is the paper gorgeous, it's very versatile! Like the designer series paper here is the Halloween paper, called Happy Haunting Designer Series paper, which is Halloween print on one side and the other side can be used for many different themes not limited to Halloween. When a paper pack can be used for many different themes and holidays, to me it's valuable!!

Have a great day, if you don't have a copy of the new holiday catalog email me at jangirlholmes@gmail.com and I will send you a copy. If you have 'fallen' for this acorn like I have, click here to order.   :)) You know its more fun to craft with others, so thank you for stopping by and craftin' with me!

Here are the items we used to make this card.

Built for Free Using: My Stampin Blog


post signature

Stampin' Up Garden in Bloom Bee card

in , by jangirlstamps, 12:33 AM
One of my favorite stamps in the new catalog has to be Garden in Bloom....it's almost addicting! It has such fun flowers and versatile, and well you don't have to look far to find alot of ideas as using this set. Here is a fun card we made in my card class this month. Super cute and I just love how it turned out.


Is that cute or what??  It's a happy card that sends a good message.  If you have been following me, you also know I don't like naked envelopes, so a little bee flew on my envelope!!  :))


If I had to describe this card I would say it's the little things that sometimes make the biggest difference. Like the black and white polka dot paper (from the Everyday Chic Designer Series paper) is just a small strip, but what an impact. Also I only used a half of the doillie, and the ribbon  layered in the corner is basically scraps...but just that added color makes a big difference. So the next time you are making something, remember the little things.....it may change it all!


The layered ribbon with the Black Baker's Twine ties in colors together and adds a little interest.


I also used the Project Life Let's get Away stamp set to get the 'flight pattern' .

Hope you enjoyed this and feel inspired!!

Here's a list of stuff I used to make this card:


Built for Free Using: My Stampin Blog


post signature

I was so excited that the new Watercolor Wishes Kit is now available. It's on page 155 in the new catalog.  For this card, I actually didn't use the cards  that come in the kit, but made my own card using the stamps that come in that kit. That's the beauty behind this kit, it comes with incredible stamps to use over and over again, and you get all the fixin's to make cards too!! It's an awesome double whammy!! The kit comes with cardstock and all the embellishments to make 20 cards!! What an awesome kit, but for today's card I used just one of the stamps in the kit.

So here's my card:


It's very soft and pretty in real life!  You can see the embossed texture on the paper better in the photo below.


I really thought this turned out real cute!!! I think the texture of the Color Me Irresistible paper and the Vellum are such a nice combo!


Did you notice the Metal Rimmed Pearls? They are on page 161 in the new catalog. They have adhesive on the back and come in a couple different sizes. They really help make this card. It's kind of a simple elegance to me!! I saw a card similar to this, made by Ronda Wade so I had to CASE it and add my own spin on it.

Here's what I used on this card:


Built for Free Using: My Stampin Blog


Have a great day! Click here to order be sure to use hostess code FRXEXQUX. I will have a drawing for $25 worth of FREE product.


post signature
Here's a fun card I made using one of the  new hostess sets available in the new catalog it's called The Best Thoughts. Although the flower in this stamp set is incredible, for this card I used the flower from You've Got This stamp set. It's a clean and simple card, but I really like how it turned out.


Is that pretty??


I really like the butterfly on this card, it looks 3D, really giving this card a great look. I kept the card simple, with the black border adding drama.


I continued the theme on the inside.


I ended up using this card for a swap I was in. I love how the Watermelon Wonder Ribbon, is sneaking out the bottom.


Have a great night.

Here are the items I used for this card:


Built for Free Using: My Stampin Blog


click here to order one of your new favorites!!


post signature

Stampin' Up You're Sublime card

in , by jangirlstamps, 5:42 PM

Here's a happy card that I made, for a friend. I am hoping this cute card says sorry and brings a smile to her face!! I combined the You're Sublime stamp and the Teeny Tiny Wishes stamp, and came up with 'I'm toadally sorry!" This is one of those stamp sets that hit the top on my wish list when the new catalog came out! I just love this happy little stamp set!!


Here's my card:


Is that sweet?? How fun is that??


 Oh it just makes me smile!!  If you are wondering about the striped paper, its from the new Envelope Paper. paper pack. It's for all kinds of projects, not just envelopes!! I did line my envelope, and used it on my card!! How fun is that!! It's thin and light-weight and just fun!!


I stamped the front of my envelope with the cute little frog!!


To get the words I needed I simply masked off the word 'toadally' and stamped it in the new Cucumber Crush, and then lined up the words from Teeny Tiny Wishes and inked them with Melon Mambo. This card is just too sweet!!

I hope you feel inspired!! Thanks for stopping by.

Here is the items I used for this card:


Built for Free Using: My Stampin Blog


post signature
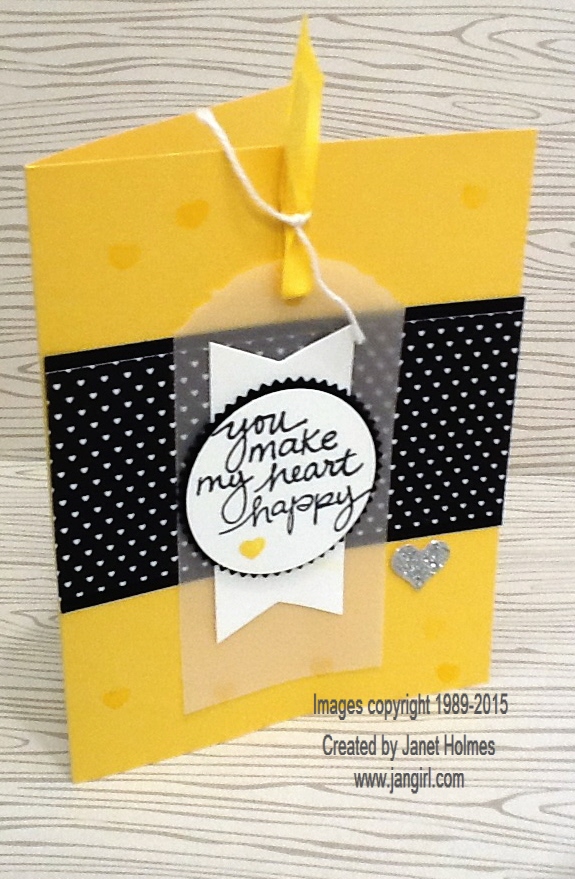
I have to share this super cute card that we made in class this month. It's happy and fun, we can all use a little more of both in our lives!! The Lovely Amazing You stamp set has font and wording that is perfect for many types of cards and treats! When you pair yellow and black together and a happy stamp set..... you got a winner!

Here's our card:


This card has lots of layers and different textures! I just love it! And plenty of hearts here and there, can you count how many different hearts there are??  (answer on bottom of post!!)  just a fun heart counting game!! :)


Here is the order of layers:

  • Lovely Amazing You stamped with Momento Tuxedo black on 1 3/4" circle punch
  • Starburst Framelit (retiring...get it while you can) in Basic Black
  • Banner from Mini Treat bag thinlits, notice it has banner ends on BOTH ends...cut in Whisper White
  • Ornate Tag Topper punch cut out of vellum
***when I put these together I used a dimensional between the Starburst Framelit and the white banner. What's always important when working with Vellum is to "hide" your adhesive, otherwise it can show through, so I put it right on the Vellum where the White banner would cover it up***

To make the bow, I simply just used the Daffodil Delight cotton ribbon, and tied a piece of Whisper White Baker's twine.

This is a card we made in one of monthly Demonstrator meetings. That's one thing I love about being a demonstrator is all the friends I have made!! We have monthly meetings and share ideas with one another and just laugh and have fun. I share this because Stampin Up is having a couple a GREAT specials, next Tuesday June 2nd!


Let met take a moment to explain about June 2nd:


·                     The new 2015 - 2016 Annual Catalog will go live on Tuesday, June 2nd. 
·                     The old 2014 - 2015 Annual Catalog will still be up on the ordering page.  This is your absolute last day to order any retiring products (while supplies last).
·                     The Occasions Catalog will also still be up on the ordering page and you'll be able to order from it as well (while supplies last).
·                     The current Hostess Program will still be in effect on June 2nd.  However, on June 3rd a new Host Rewards Program will begin.  If you're order reaches the $150 mark, you'll have $25 in FREE host rewards to use on both "old" products or choose from the new products in the new catalog!

"Hosts" (or those whose order reaches $150 or more) can choose host only items from the 2014-2015 Annual Catalog, the 2015 Occasions Catalog or the 2015 - 2016 Annual Catalog.  (That's a lot of host choices!)
·                     Here's the BEST part about June 2nd:  You'll have more choices than ever for your Starter Kit! The Starter Kit is $99 (plus tax; ships for FREE) and you choose $125 in product PLUS, Stampin' Up! is sweetening the deal with a BONUS of 2 FREE stamp sets from the NEW catalog!

In Texas, the total for the Starter Kit with tax is around $107 but you'll actually be receiving more than $150 in products!
**And, as always, you can take advantage of the savings of products on the Clearance rack, weekly deals, and retiring items
Can you see why June 2nd is going to be an interesting day?  Mark your calendars, hop online and snag some great deals! 

PLEASE let me know if you have any questions.  I want to make sure you get the most bang for your buck. Just email me jangirlholmes@gmail.com .


Heart Answer:  4 (the Stacked with Love Designer Series paper has little tiny hearts, the Daffodil Delight hearts stamped from Lovely Amazing you stamp set, on the background of the card, also the Tiny Yellow heart on the sentiment, last is the Silver Glimmer Heart from the Itty Bitty Accent Punch pack)  Did you get it right???   kinda fun huh??   :))


Here's a list of items I used:
Built for Free Using: My Stampin Blog


post signature
© Jan Girl · THEME BY WATDESIGNEXPRESS