Showing posts with label 10 weeks of halloween
Quick and Easy Halloween Treats

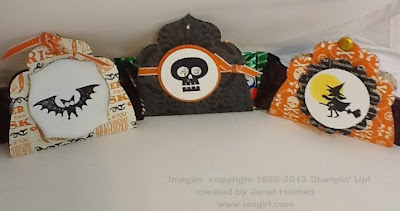
Just a few days away... and then the Trick -or- Treaters!!! Wahoo... I love this time of year. Here's a quick treat you can make fast!!


I made the shape out of Apothecary Accents. Did you know that you can cut 2 at a time on the thinlits!! This project is all about quick!! ( and cute!!)


I like the rhinestones in his eyes....just the right amount of bling!!  :)


I love the bat! All these stamps are from Halloween Hello!


I love how the Glimmer bard picks up on the moon!!


Have a great day, hope this inspires you on some last minute treats!!

Items used:

Stamps: Halloween Hello
Paper: Witches Brew Designer Series Paper, Modern Medley Designer Paper, Pumpkin Pie cardstock, Whisper White cardstock
Accessories: Apothecary Accents, 1 3/4" circle punch, 1 1/4" circle punch, 1 3/8" circle punch, scallop punch, glimmer brads, Pumpkin Pie Taffeta Ribbon, Staz on Black ink


Janet Holmes


Quick and Easy Halloween Treats

Want to make some quick and fast Halloween treats? Your kids will love make these!


Inside is a Carmel apple sucker!


Here's how to make them:


  1. Start with a piece of cardstock 2 1/4 x 6 1/2 (I used Tangerine Tango)
  2. Score at 2 1/2 and 4
  3. I held mine together with glue dots on the top by the sucker stick
  4. Stamp image using Staz on, and I daubed a "moon" in Daffodil Delight using Dauber
  5. Cut out using 1 1/4 circle punch, and the Modern Medley paper cut with the 1 3/4 scallop punch
Here are some pictures from our Spooky Halloween class.


I love the Spooky Banner!!


Notice the treats are labeled.... I just simply cut the witches brew paper and made treats to go along 
with the wording.... pretty stinkin cute!!


Have a great day!!

Janet Holmes
10 Weeks of Halloween: Week 8: 

Peek-A-BOO!!!

Halloween is one of my favorites!! It is just about fun times!! Check out this scrapbook page....don't get scared!!! ha-ha!!


I just love the new Polymer "Bite Me" stamp set!!!


Pretty scary I know!!!   :)


I LOVE the spider dropping off the "A"


The "BOO" just cracks me up


Are you wondering how I made the Scallop Rectangular? I used the Square Thinlit and Cut out the large Scallop Square and then repositioned the paper, lining up the scallops and ran my paper back through the Big Shot and that's all there is to it!!. A Square made rectangle pretty easily.


I hope this inspires you to scare up some fun!!

On the First Saturday of the month is Scrapbook Saturday!! YEAH! If you live in the Burleson/ Ft Worth area and would like to attend, let me know!

Items used:
Stamps: Bite Me
Paper: Black Cardstock, Witches Brew Designer Series Paper, Old Olive Cardstock, Pumpkin Pie Cardstock, Soft Sky Cardstock,Whisper White Cardstock
Accessories: Chalk Pen, White Embossing Powder, Rhinestones, Typeset Alphabet Bigz, Square Thinlits

Have a "Bootiful" day!!

Janet Holmes


Halloween Party Invitations: Week 7

This Halloween will be our 12th year to have a pumpkin carving party!! We look forward to this all year!!! That's scary all by itself.  So here's our invite:


This is a gate fold invitation. I couldn't resist the belly band with the Halloween bash ticket....oh ya!!


I used the chalkboard technique, what do you think??


Inside I put all the invitation info . The web is the new Bite Me Polymer stamp.  Love that!! This is the first time I have used the Chalk Pen, oh wow!! It writes soooo smooth, I really, really like it! Honestly, give it a try..

Have a scary day!!   :)

Items used: 
Paper: Basic Black Cardstock, Whisper White Cardstock, Pumpkin Pie Cardstock
Stamps: Halloween Bash, Bite me
Accessories: White Embossing Powder, Chalk Pen, Rhinestones, Ticket Punch

Halloween Week 6

Well it is creeping into October...I can hardly believe it!! I wanted this week to be some spooky home decor!! Well not all that spooky!!  :)

This is my take on the Halloween Spooky banner. So cute!!


I cased mine from Cindy Peterson. I put rosettes on each letter, love it!!


Here is a closer look...I put a scallop circle behind the embellishments, and the extra rhinestones really add and extra wow!!


The extra rosettes I used paper from the Polka Dot Parade. On the "O" and the "K" I made banners from cardstock. I really liked the way it turned out!!


(This is how it looks on the mantel....too fun!!)


After I made the Spooky Banner, I just couldn't stop making rosettes!! There should be a caution sign....these can be addicting!!  (ha-ha!!) So I decided to make this little Mason Jar Decoration...why not!!  :)


Won't that be cute on the table! 


I thought this turned out super cute!!  


And this next project, was a gift my dear friend and neighbor Jen brought over yesterday!!


It is such a "triple WOW" wreath!! I just love it!! 


Hope some of these ideas gave you some "spooktackular"  inspiration today!!

Have a great day!

Janet Holmes


Fun Mini Muslin Bags : 10 Weeks of Halloween Week 5


So here are the Mini Muslin Bags!! These are too fun.  They are a little bigger than I thought they would be, they are 4" x 5 1/2". I put some homemade cinnamon spicy nuts in mine.


I used the stencils from the Build a Banner Kit.


Is that cute or what? Notice the "veins" in the leaf?  I used Bakers Twine and made little "veins".


Oh how I love Halloween!! I absolutely LOVE the new Morning Post Numbers stamp set. The Mini Muslin Bags and the Morning Post Numbers come in a bundle. WAHOO!! Even better.


I just Love the Chevron Ribbon!


Mini Muslin Bundle:


Morning Post Clear-Mount Bundle


Morning Post Clear-Mount 
Bundle133292Regular Price$26.61Preferred Price$23.95
LEARN ABOUT PREFERRED PRICING
BUNDLE & SAVE!
Morning Post Clear-Mount Stamp Set + Mini

Muslin Bags = 15% savings for you! 


Fall Muslin Bags:
Stamps: Banner Greeting (hostess set)
Paper: Sweater Weather Designer Series Paper, Cajun Craze Cardstock
Accessories: Autumn Accents Bigz Die, Naturals Designer Buttons, Early Expresso Bakers Twine, Tempting Tourquoise Ink


                                31 Muslin Bag: (No not that 31!!  ha-ha)
Stamps: Morning Post Numbers, Halloween Hello
Paper: Glimmer Paper, Witches Brew Designer Series Paper, Basic Black Cardstock, Pumpkin Pie Cardstock,
Accessories: Deco Labels Collection Framelits, Black Staz on Ink, Pumpkin Pie Ink

Creepy Halloween Muslin Bag:
Stamps: Halloween Bash,
Accessories: Black Gingham Ribbon. Pumpkin Pie Taffeta Ribbon, Black Staz On Ink

Have a great day!!

Janet Holmes


Witches Brew Scrapbook Page: Week 4

Halloween is one of my very FAVORITE holidays!!! I can't help but get excited!!


This turned out super cute!!!


I really like the Witches Brew paper, I think it is real versatile. This cute page went together real fast!!


So if you want to make some cute pages, get the Witches Brew Paper!


Items used:
Paper: Witches Brew Designer Series Paper, Whisper White cardstock, Slate Gray cardstock
Stamps: Hearts a Flutter, Halloween Hello
Accessories: Brights Button, Hearts a Flutter Thinlits, Cherry Cobbler Bakers Twine, Iridescent Ice Embossing Powder, Black Embossing Powder


Enjoy !!

Janet Holmes


 10 Weeks of Halloween: Week 3 

    Spooky Flip Album

These albums are so fun and extremely easy to make. I used Stampin’ Up!’s Witches Brew Designer Series paper and part of the kit from the Halloween Banner Simply Created Kit. But you could easily create your own using coordinating card stock, patterned paper and punches instead.


                                                                           Page 1


On this page I used a couple pieces of Witches Brew Washi Tape.


Page 2


Again I used a couple pieces of the Witches Brew Washi tape, I LOVE how it all coordinates....makes it easy!


Page 3


 I used one of the black Vintage Faceted buttons that come in the Halloween Banner Kit, and the cut the saying from the Witches Brew Designer Series paper. Very cute!!

                                                                     
                                                                          Page 4


This page will be the page the paper that is seen the most when the book is closed, so I really liked this paper here. Don't you love the Monster Munchies in the corner!! Again just simply cut from the Witches Brew paper, and used one of the yellow buttons from the Halloween Banner Kit.


                                                                      Page 5

Here I used the bat from the Halloween Kit and cut more fun saying out of the Witches Brew Paper. I cut a circle out to resemble a moon.  :)

 
                                                                     Page 6


This is probably my favorite!! It kinda cracks me up when I look at it! Very fun! (at the end I have more close up pic)  I used ribbon and buttons from the Halloween Banner and the Caramel apple saying from the Witches Brew Designer Paper.


                                                                    Page 7


This page I used the Witches Brew Washi Tape, a couple of buttons from the Halloween Kit and another adorable design from the Witches Brew Designer paper!!


Step 1
Choose two different colors of 12 X 12” card stock and cut them in half. You only
need one of each color (two different colored pieces measuring 6 X 12”).
Next choose two sheets of 12 X 12” patterned paper and cut them in half. You will
only use one of each of these too. This entire album is made with just four 6” X 12”
pieces.


Step 2
Decide which of these 4 pages will be your front, 2 middle pieces and your back
page. ***Your last or back and the very front page are the same piece after it is
scored and folded.
I like to start with card stock for my front and back as it’s thicker and more sturdy.
Next is patterned paper, then card stock, then patterned paper for the center layer.


Step 3
Score the pieces as follows:
1. Page 1 (front and back layer is card stock). Score it at both 2 3/4 and again at
3”. (this is Pumpkin Pie)
2. Page 2 is patterned paper. Score at both 3 ½” and again at 3 3/4”
3. Page 3 is card stock. Score at both 4 ¼” & 4 ½”. (this is Slate Gray)
4. Page 4 is patterned paper. Score at both 5” and 5 ¼”


Step 4
Fold on the score lines and layer these
four sheets of card stock and patterned
paper together to form a book like shown.


Step 5
Punch two holes in the binding with a
Crop-o-Dile (or a 1/8” or ¼” circle punch).
Thread the ribbon through these holes
and tie a knot on the outside of the book. I used the ribbon from the Halloween Banner Kit.


Step 6
Now you’re ready to decorate your book. I started by decorating my front page first
and deciding which die-cuts I wanted to use from the Halloween Banner Kit. Decide if you are spelling a word or just using decorative tabs on each page. There are 8 pages total so you could spell an 8 letter word .(spooky is actually 7,and it worked great!). Layer the letters so they can be used at tabs to turn the pages. To make the letters look extra snazzy I used the new Silver Foil behind the letters!! Kinda cool!


Tips:
Position your letters and adjust them to your liking, I actually placed the first 2 letters on the first page, it made my letters flow nicely. Once my tabs were decided on, I then moved to the inside of my pages. I love the Witches Brew Paper, it has plenty of fun sayings. I simply cut out words,  and used a few pieces (buttons, ribbon pieces) from the Halloween Banner kit, and that's it!! Pretty simple!!

***Before I decided the arrangement of the album, where the letter "K" is, happens  to be the paper that will have the most visualization. I chose the skull paper because the graphic was large and it seemed to fit well! Any combo will work, that's just what I did! :)

Here are some close up views.


This is actually a pretty fast project, the kit and the paper really make it easy! If you would like to order click here

                                 Have a great (and Spooky... ha-ha!) day!!

                                Janet Holmes


10 Weeks of Halloween: Week 2

Is it September? feels like October at my house.... ha-ha!!  Here are a couple cute halloween goodies!!


Are these cute or what!!! I just love them.


The witches hat has lots of bling, the silver speckles on the hat are from Gorgeous Grunge embossed with silver embossing powder.


Pretty fun!!!


The ribbon on top is the Black Chevron Ribbon, to get that raggedy look I shredded it with scissors.   LOVE IT!!


The little bat, is really cute. I am not sure you can tell but his pupils are out of the Silver Glimmer Paper.....scarrrry!! 
And his sweet little lips are out of the Red Glimmer Paper


Every little bat, has a back side! 


                   What would Halloween be without a little candy corn. 

I will be posting a video on how to make these little scary treats in the next couple days!!                         


                                                    Enjoy!!

                                               Janet Holmes


© Jan Girl · THEME BY WATDESIGNEXPRESS