
For today's Saturday Series I wanted to highlight the awesome Painted Blooms Designer Series Paper!! I just LOVE this paper....but it's leaving so get yours while you can. So I used different sheets on all three of these projects. I hope you enjoy!!

Is that paper gorgeous?? or what!! The gate fold card we are making this month in class, it's a slightly different gate fold. It closes completely, giving you plenty of room to write your message.

The Silver embellishments (the Silver Foil Sheets and the Silver ribbon) just go perfectly with Soft Sky.

I layered the Butterfly Die, with a Silver Foil Butterfly punch. Very pretty!!

I stamped the Tulips on the inside of the card, the Painted Petals stamp is a perfect match for this paper. I first stamped the stems in Wild Wasabi and then used Rose Red, Daffodil Delight ,and Soft sky marker on the tulip tops.

What's great about this card is that it has plenty of space to write your message. The measurements are 4 1/4 x 11, and scored at 2 3/4, turn paper and score at 2 \3/4. I hope you like it!!

For this sachet bag, this full print sheet in this pack of paper works beautifully here!! It does all the work...all you have to do is cut and score!!

I found a the directions for this bag on Crafty Caroline Creations. I tried to make a youtube video, but I had technical issues!! Anyway the measurements are start with a piece of Designer Series Paper 10 1/2 x 8 1/4.Then you score on the long side (10 1/2" side) at 1/2", 2", 5 1/2" and 7". Then score on the short side at 1 1/2". Cut up to the 1 1/2" score line and use your bone folder to make sharp creases. The bag then just folds up easily. One tip I have is I knew this part of the paper is where I wanted the front of my bag, so just look at your paper, before you score so you pre-plan your front part of the bag!

This sweet little candy pouch is too fun and cute. Every month our group gets together and we swap cards, 3D items. I received one similar to this from my Upline's Upline, Sharon Cheng. This little treat holds a candy just perfectly.

Who wouldn't want to get this little guy!! TOO fun and cute! Right up my alley!!
Scallop Circle Treat how to:
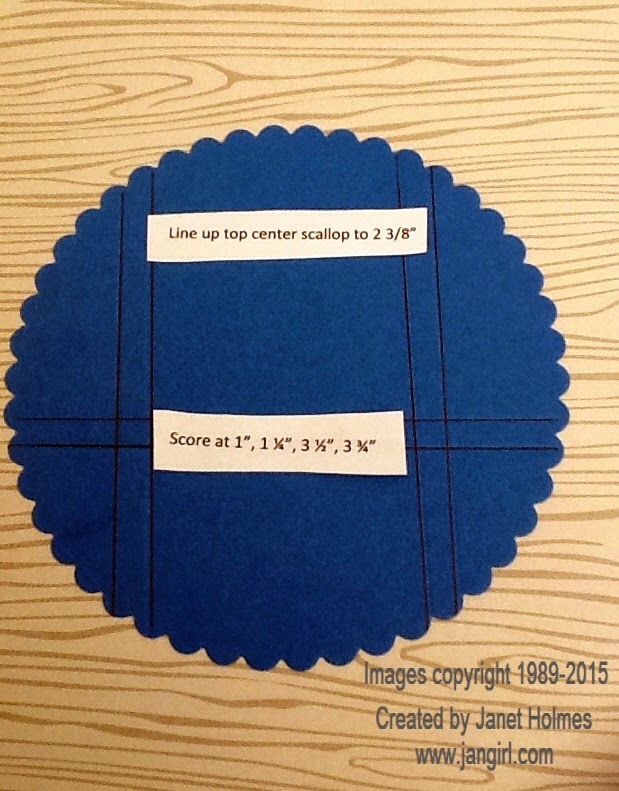
- Cut a scallop circle using the Circle Collections Framelits.
- Line up the top center scallop at the 2-3/8" mark on the Simply Scored board.
- Score at the 1", 1-1/4", 3-1/2" & 3-3/4".

- Turn the circle 90°.
- Score at the 2-3/4" & 3" marks.

- Trim off the corner pieces at the inner-most score lines.
- Fold on the score lines, but do not adhere together yet.

- Cut a 2-1/4" x 5" long piece of DSP.
- Die-cut the rounded edges with the Circle Collection Framelits.
- Cut the strip in half, so you get 2 from one cut!!!
- Adhere to the inside of the box as the liner.
- Adhere the box flaps with Sticky Strip.
I hope you feel inspired today!!
Here are the supplies I used....be sure to make sure you get the Painted Blooms Designer Series Paper!! click here to get your favorites!! Please use HOSTESS code 39J9JZQU.
I will have a drawing for $25 FREE out of the new catalog for every order that uses this hostess code!!!
I will have a drawing for $25 FREE out of the new catalog for every order that uses this hostess code!!!


Wow Jan, I'm blowin away with your blog. Amazing job, love your cards and all your tutorials of your projects. Thank you for sharing. Great set up on your blog also, did you do it yourself.
ReplyDeleteWow Jan, I'm blowin away with your blog. Amazing job, love your cards and all your tutorials of your projects. Thank you for sharing. Great set up on your blog also, did you do it yourself.
ReplyDelete