
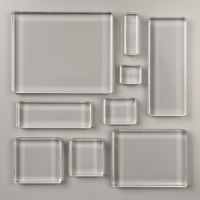
I know if you have ever stamped then you have either used a clear block of some kind, or a wood-mount stamp.Today's Tool is the Clear-Mount Acrylic Blocks. A clear block is an essential tool needed to stamp with clear block. The Stampin' Up Clear Mount blocks are made from high quality, sturdy acrylic and are grooved on the sides for easy gripping. These blocks will hold Clear Stamps as well as the Photo polymer stamps. They come in 9 sizes to accommodate a variety of stamp sizes. The smallest is 1-3/16" x 1- 1/4" to the largest size block which is 4 7/8" x 6 ", each block is 3/4" thick. Here are the sizes.
118487 Block A (1-3/16" x 1-1/4") $3.95
117147 Block B (1-5/8" x 1-15/16") $5.95
118486 Block C (2" x 2-1/4") $6.95
118485 Block D (2-7/8" x 2-11/16") $8.50
118484 Block E (3-7/16" x 4-7/16") $11.95
118483 Block F (4-7/8" x 6") $16.95
118489 Block G (3/4" x 2-1/2") $4.50
118490 Block H (1-5/8" x 4-7/16") $8.50
118488 Block I (2-1/4" x 5-7/8") $11.95
118491 Block Bundle (Blocks A-I) $66.95
You can purchase the blocks individually or as a bundle. Our
block bundle offers you all the blocks you need in
one purchase at over a 10 percent savings—it's like
getting some blocks free!
FYI:
- I have had some people ask me how do I get an image straight without a grid line on the block. Well for me, since you can see easily through your block you can line up pretty easily. You can use the Grid Paper as a guide to help you line it up, or I use the Stamp-A-Ma- jig to create a perfectly lined up image every time.
- I know their are less expensive blocks out there, but once you stamp using one of these blocks, you'll love how it feels in your hand and how even it stamps. Really!
- I have found that my image comes out more evenly stamped if I use an appropriate sized clear block, instead of one that is not too big or too small.
- If you are starting your collection of blocks, I think H, C and D are really good choices. If I could only choose one, I would start with D.
- You can also use the clear block as a stamp itself. Like place the bare clear block, ink up the block stamp it down, and your image will be a squarish image ( the image of the block). Just like all stamping you can stamp off on a scratch paper to create an even softer image.
- Sometimes I will put one stamp on one side and another stamp on the other side of the block, this makes it easy to stamp both images easily.
If you have trouble getting your stamps to stick to your block:
- If you press and hold the stamp in place for a few seconds it will create a stronger hold. You can also try adding a little moisture by huffing or exhaling on them, or use a slightly damp block and this creates a suction cup type of cling.
- In my classes where the stamp is gonna be used over and over again, I put a little snail of the block and that helps hold that stamp on.
- I have seen some people put Tombow Glue on their stamp and let it dry overnight and it sticks to the block.
- Remember to start with a clean block, all the oils from our hands and dust just create a barrier.
How to clean Acrylic Blocks:
The Acrylic blocks need to stay clean in order to work well. The Stampin' Mist and the Stampin' Scrub will clean Staz-On, Classic Ink, Craft Ink, Versamark stains from your block. Avoid using Stazon Cleaner directly on the block, as it will leave an oily residue that inhibits the functionality of the cling. You can also clean them in a dish of soapy water, rinse and dry well.
If you wish to order click here, remember now is a great time to place on order. During Sale-A-Bration for every $50 you spend you earn a FREE Sale-A-Bration item.
Have a great day!
Janet Holmes
If you wish to order click here, remember now is a great time to place on order. During Sale-A-Bration for every $50 you spend you earn a FREE Sale-A-Bration item.
Have a great day!
Janet Holmes


Add your comment